Custom Card Decks
 Custom Holographic Cards
 Folding Cartons
 Rigid Boxes
 Corrugated Boxes
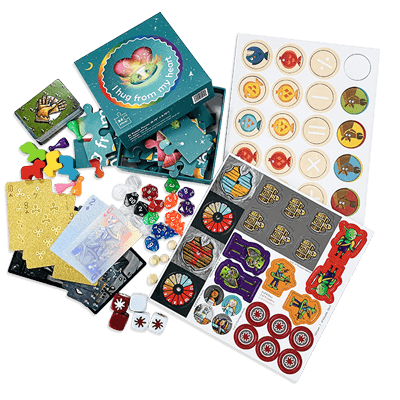
 Custom Board Game
 Kickstarter Print Solutions


How to Create Print-Ready PDFs Using Adobe InDesign?
1. Open Adobe InDesign and click on “Create New”. Input the desired finished size and choose the correct units.
2. Set margins and bleeds to at least 0.125 inches or 3mm.
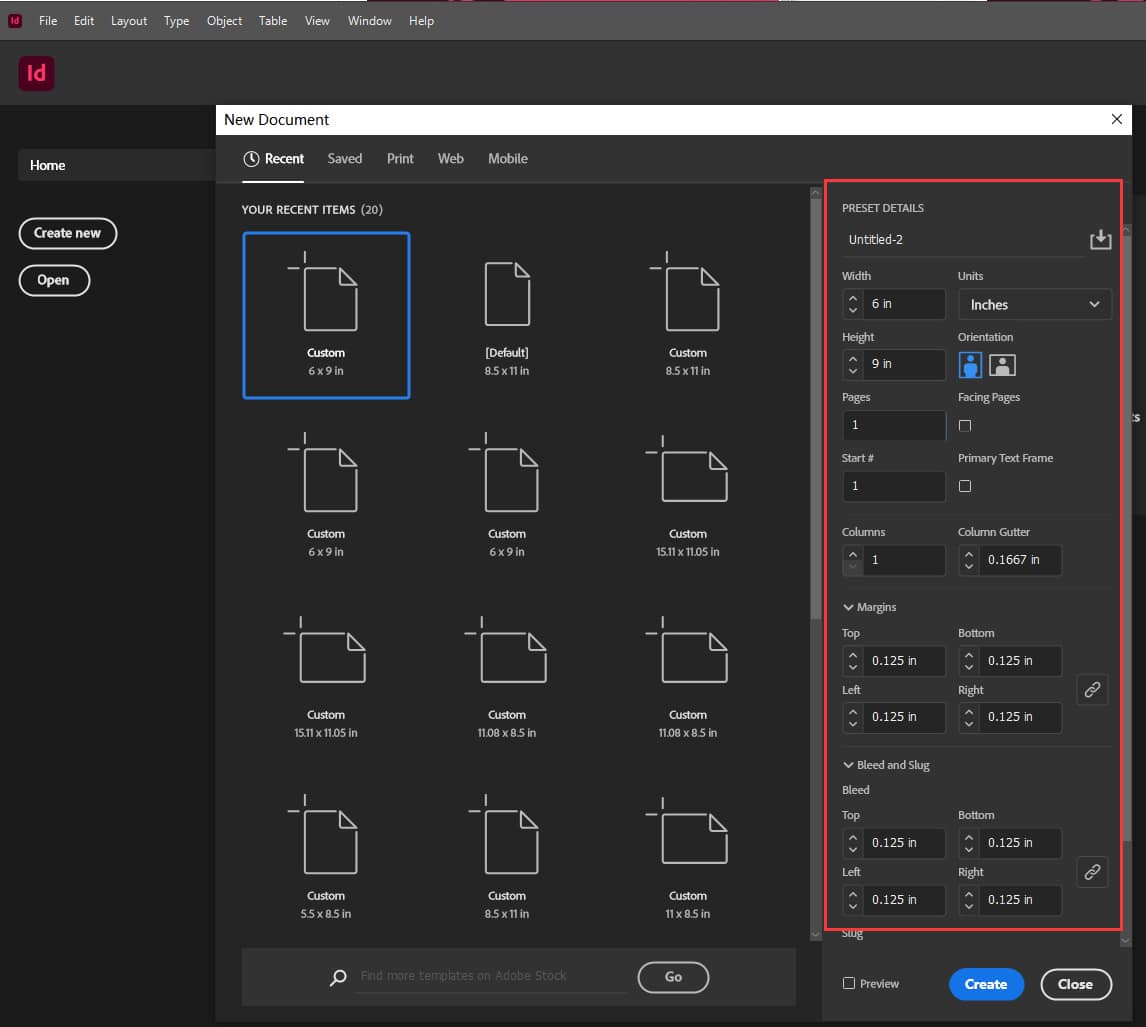
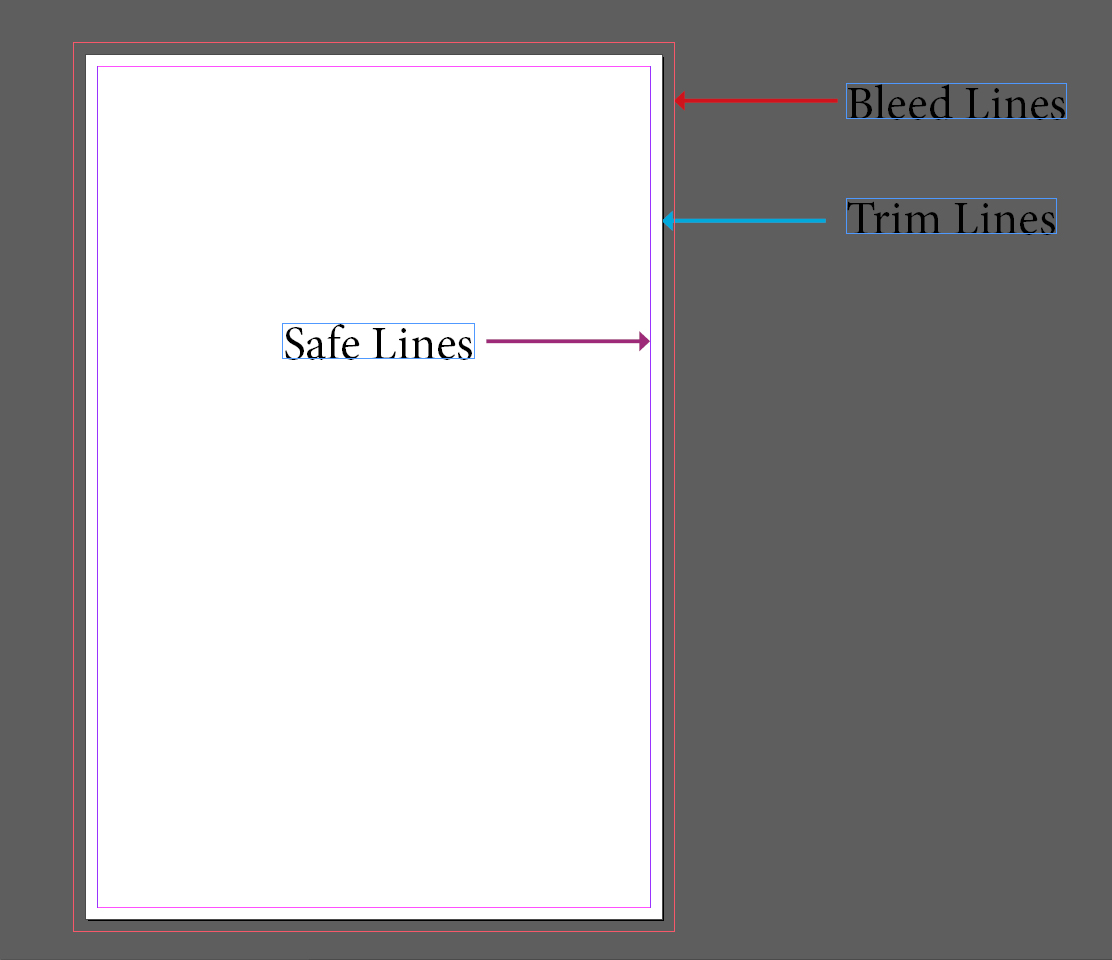
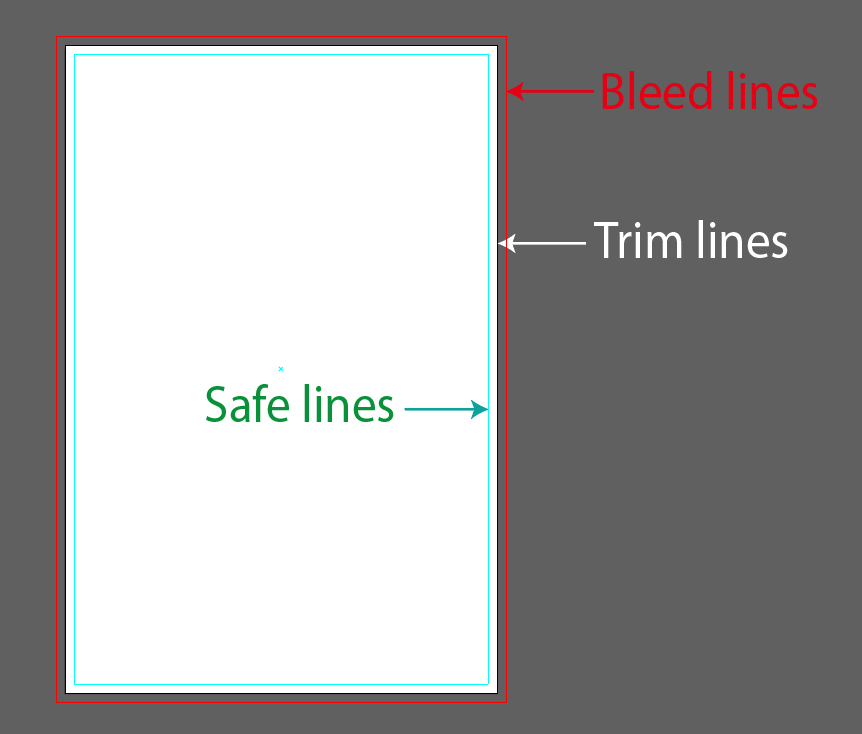
3. In the new document, you’ll see the white area as the finished part, the red lines as the bleed lines, and the purple lines representing the safety zone.
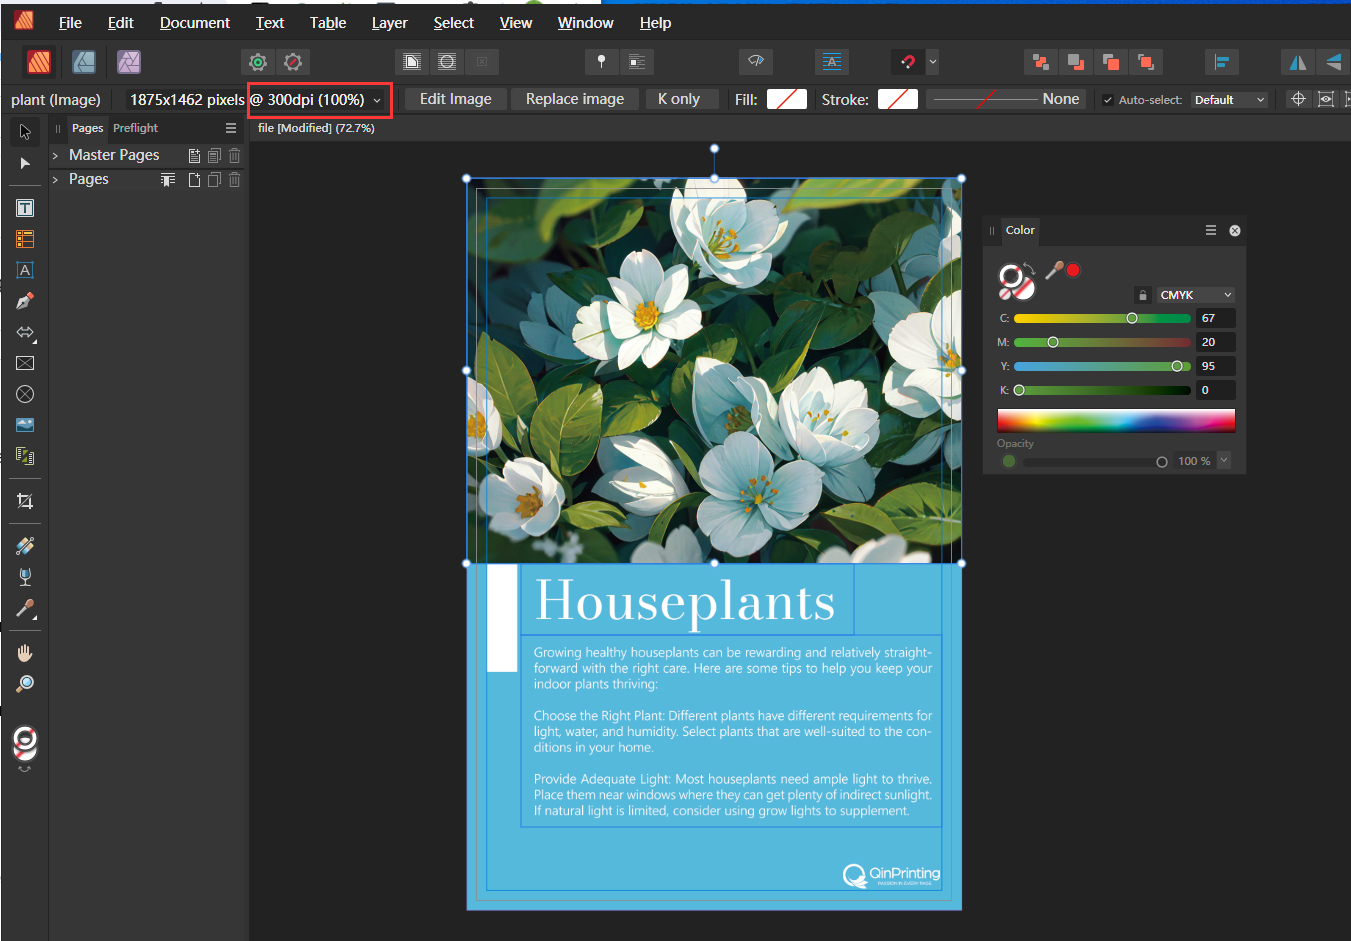
4. When editing colors, use CMYK. Ensure your images are in CMYK mode and have a resolution of 300 dpi. You can verify this information in the Links panel. Extend the background to the bleed lines and ensure important content and text are within the purple safety zone.

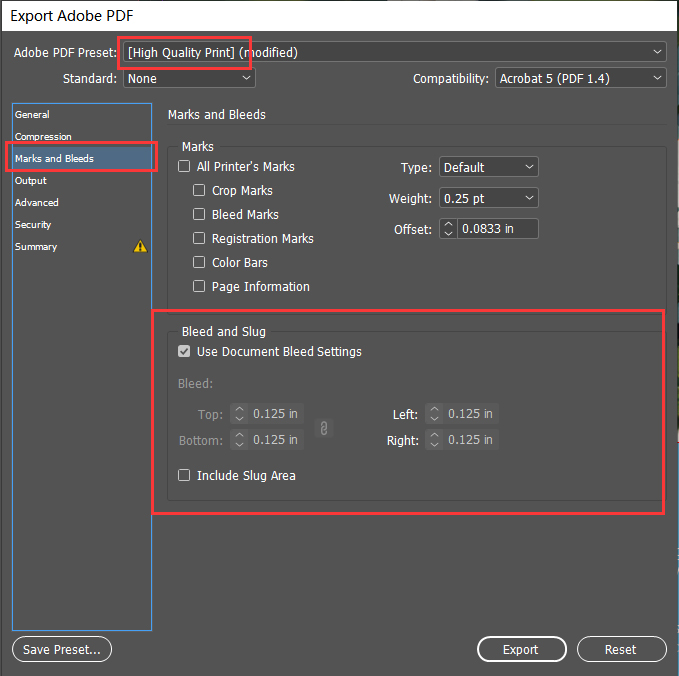
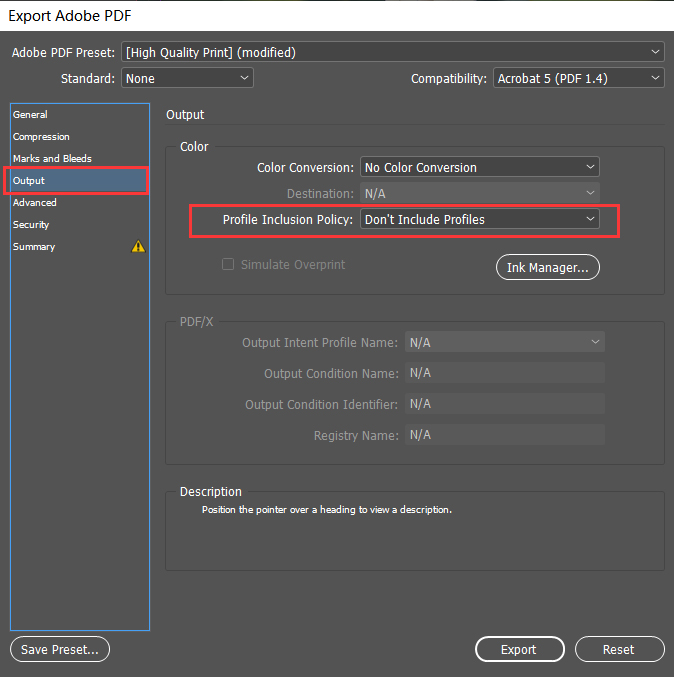
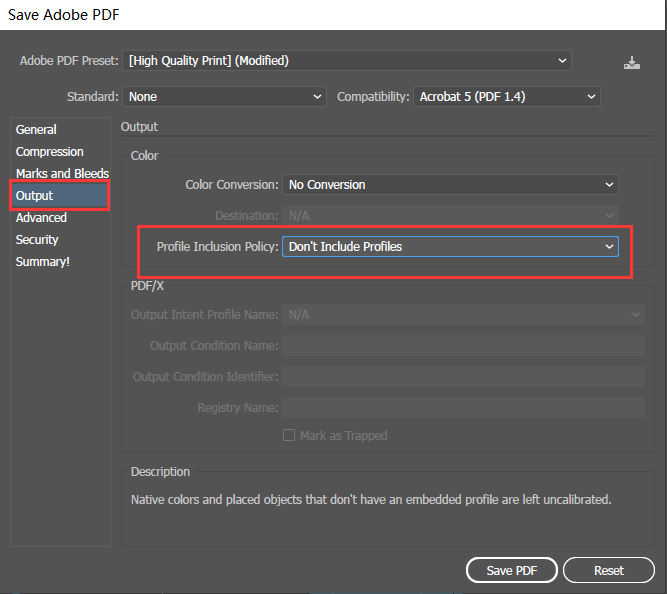
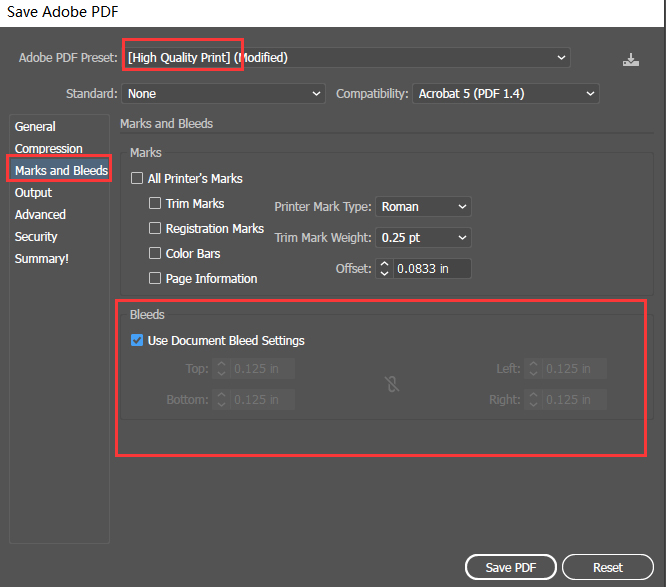
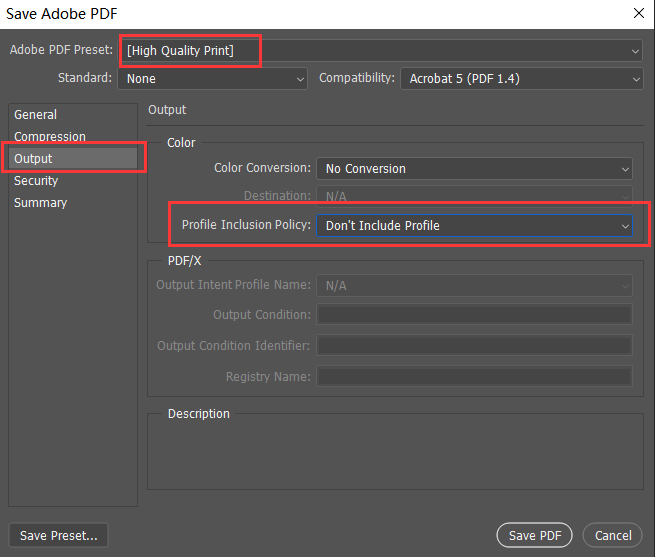
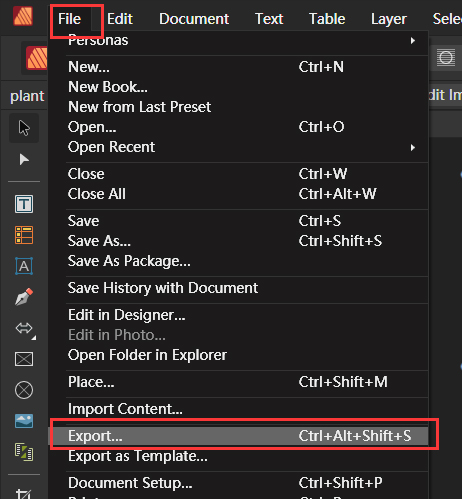
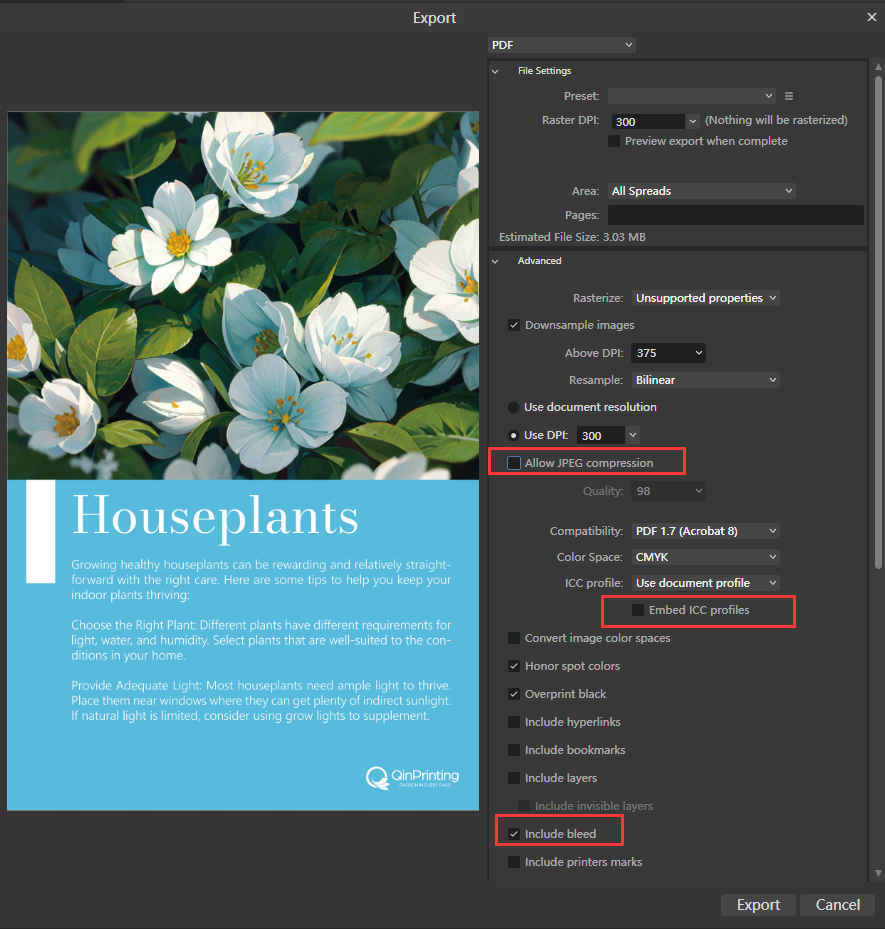
5. After completing the design, select “Export”, and choose the file type as “Adobe PDF”. In the export window, select “High Quality Print”. Under “Marks and Bleeds”, check “Use Document Bleed Settings”. In the “Output” section, select “Don’t Include Profile”.

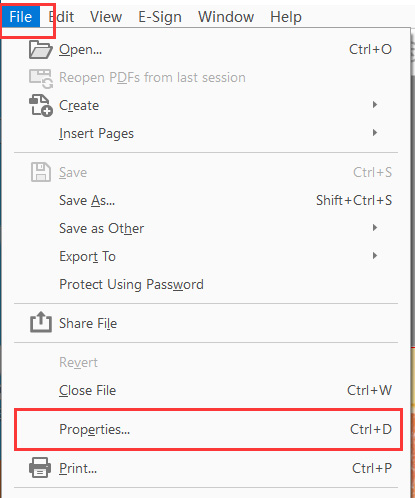
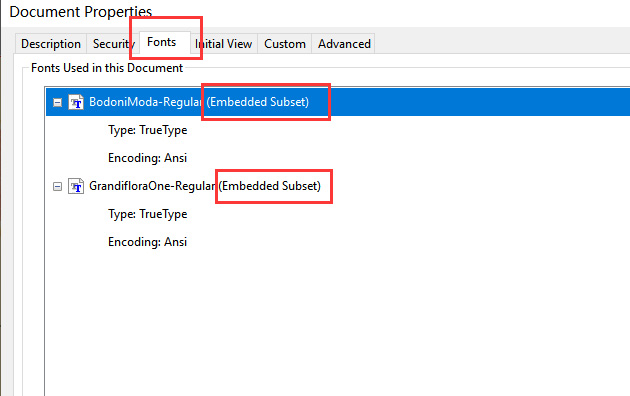
6. Open the saved PDF to confirm it includes bleeds. Click on “File” – “Properties” and check the fonts to ensure all have the “Embedded Subset” flag.
How to Create Print-Ready Design Files Using Adobe Illustrator?
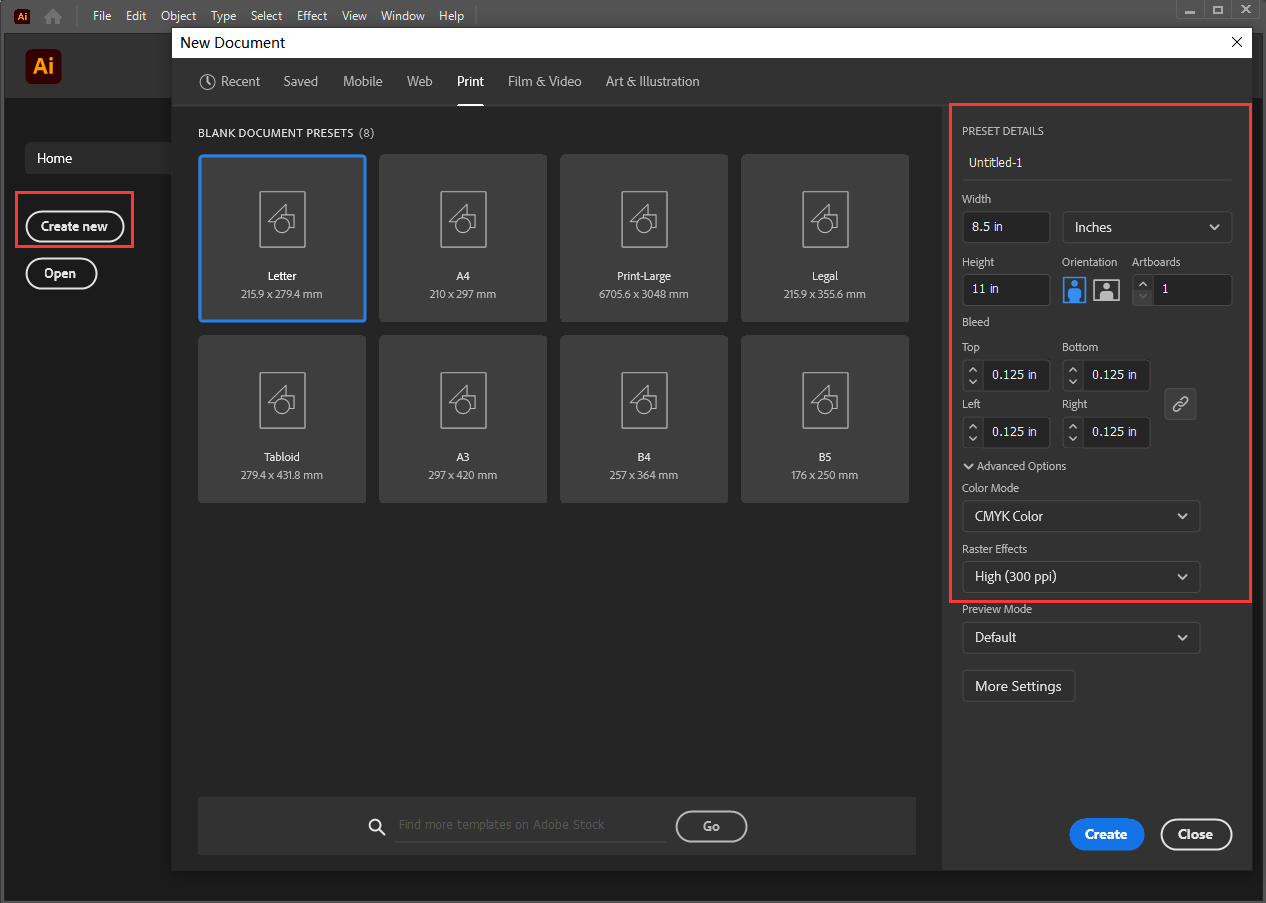
1. Open Adobe Illustrator, click on “Create New”, input your desired finished size, and select the correct units. Set the bleed to 0.125″ or 3mm. Choose CMYK color mode and set raster effects to “High (300dpi)”.
2. In the newly created document, the white area represents the finished part, while the red lines indicate the bleed area. It is recommended to place guide lines at least 0.125 inches or 3mm away from the trim line to indicate a safe area.
3. When starting your design, make sure to use CMYK color. Ensure that all your images are in CMYK mode and have a resolution of 300dpi.

4. Extend the background to the bleed area and ensure that important content and text are within the safe area.
5. Once your design is complete, click on “Save” and choose the file type as “Adobe PDF”. In the popup window, select “High Quality Print” and check the option “Use Document Bleed Settings” under “Marks and Bleeds”. In the “Output” options, choose “Don’t Include Profile.”

6. Open the saved PDF file and ensure that the size includes the bleed area.
7. Click on “File” – “Properties”, check the fonts, and ensure all fonts have the “Embedded Subset” flag.
How to Create Print-Ready PDFs Using Adobe Photoshop?
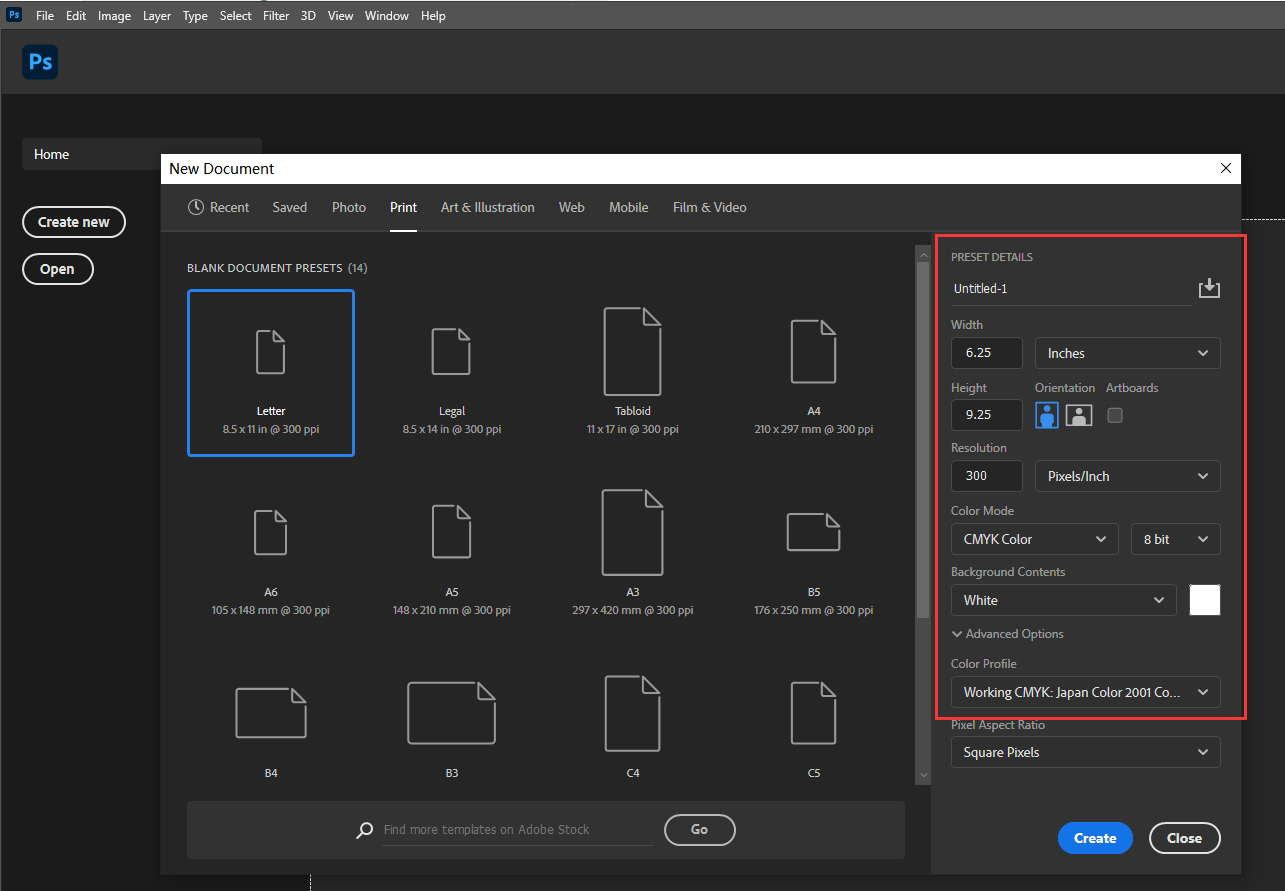
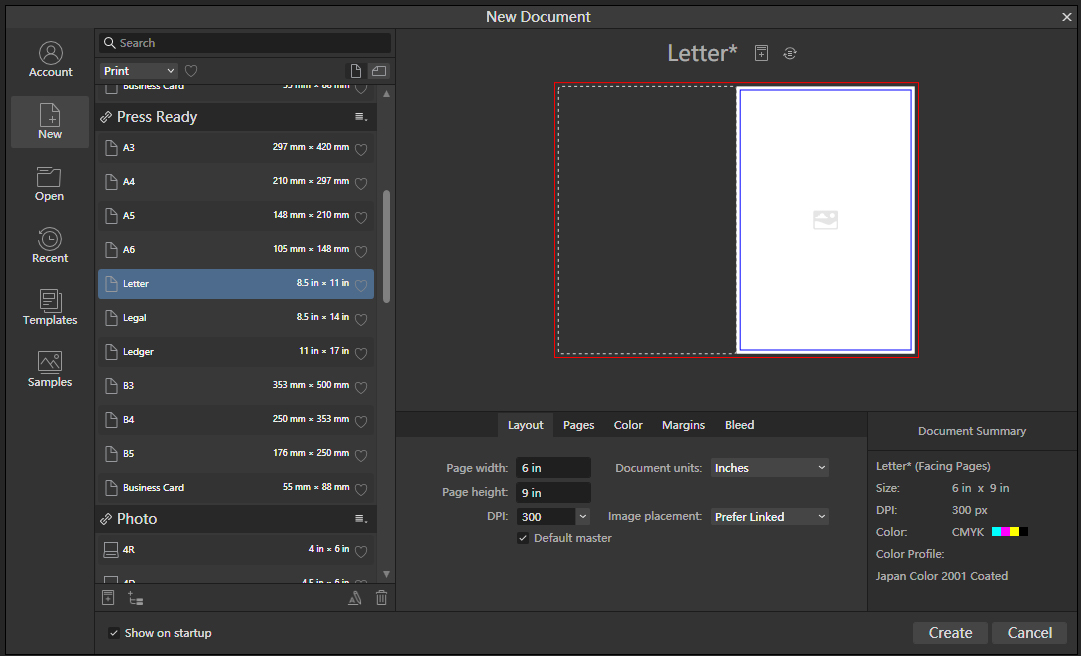
1. Open Adobe Photoshop and click on “Create New”. Enter the dimensions including bleed; for instance, if your design is 6×9 inches, input 6.25×9.25 inches (adding 0.125 inches / 3mm bleed on each side).
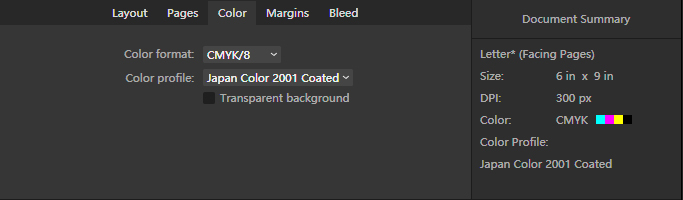
2. Set the resolution to 300, choose CMYK color mode, and in the Advanced options, select the Japan Color 2001 Coated color profile. Then, click “Create”.
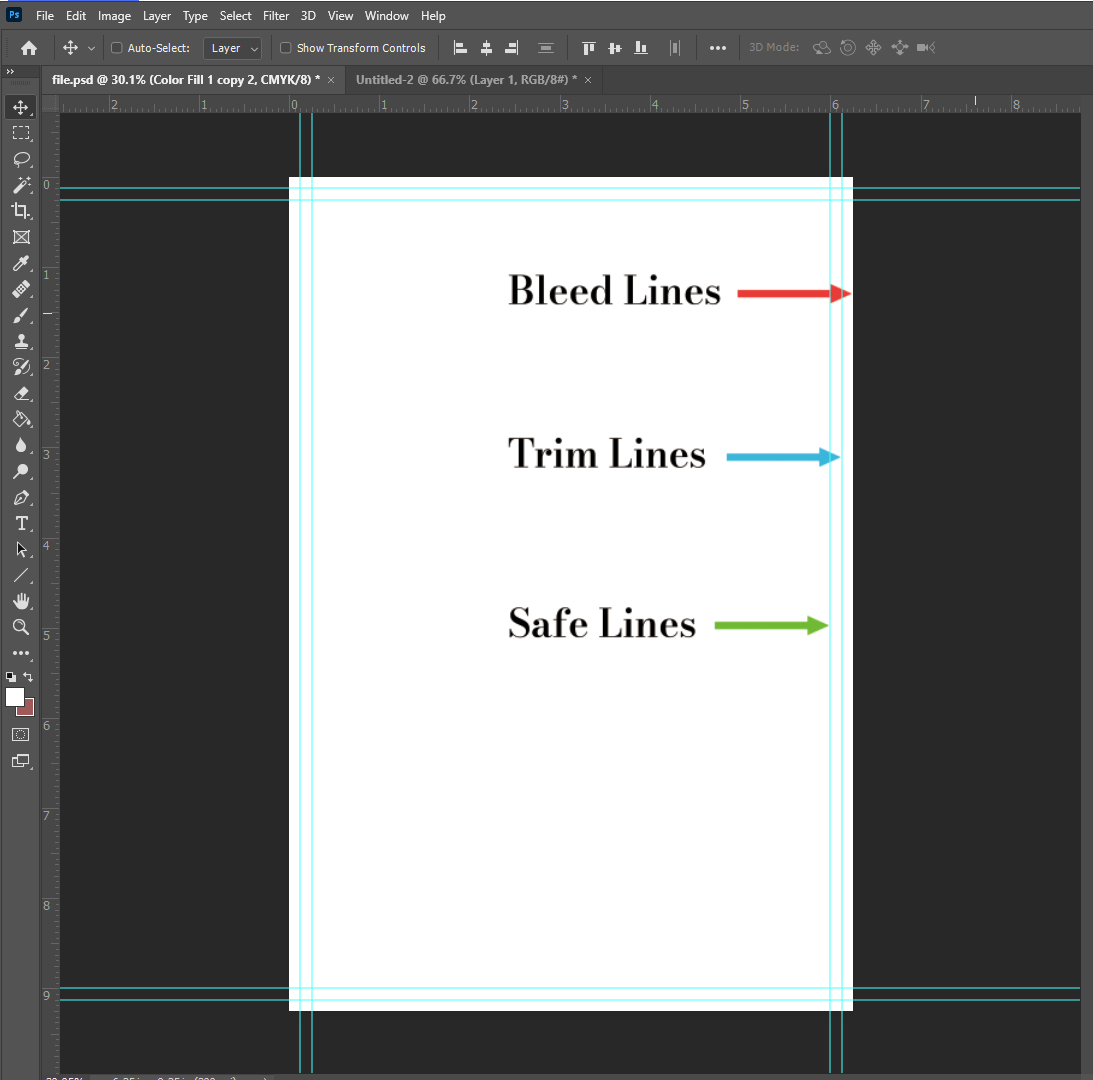
3. In the new document, the entire white area includes the bleed, while your actual product size is 6×9 inches in the center.
4. We recommend using guidelines to mark the trim lines. The safe area should be at least 0.125 inches or 3mm away from the trim lines, and it’s also recommended to mark it with guidelines.
5. Begin designing, ensuring that all images you use are in CMYK mode and have a resolution of 300 dpi. Extend the background to the bleed area and ensure important content and text are at least 0.125 inches (3mm) away from the trim lines.
6. Once your design is complete, choose “Save” and select the save type as Photoshop PDF. In the popup window, choose “High Quality Print”, and in the output options, select “Don’t Include Profile”.
7. Open the saved PDF and ensure the size includes bleed. Click on “File” – “Properties”, check the fonts, and ensure all fonts have the “Embedded Subset” flag.
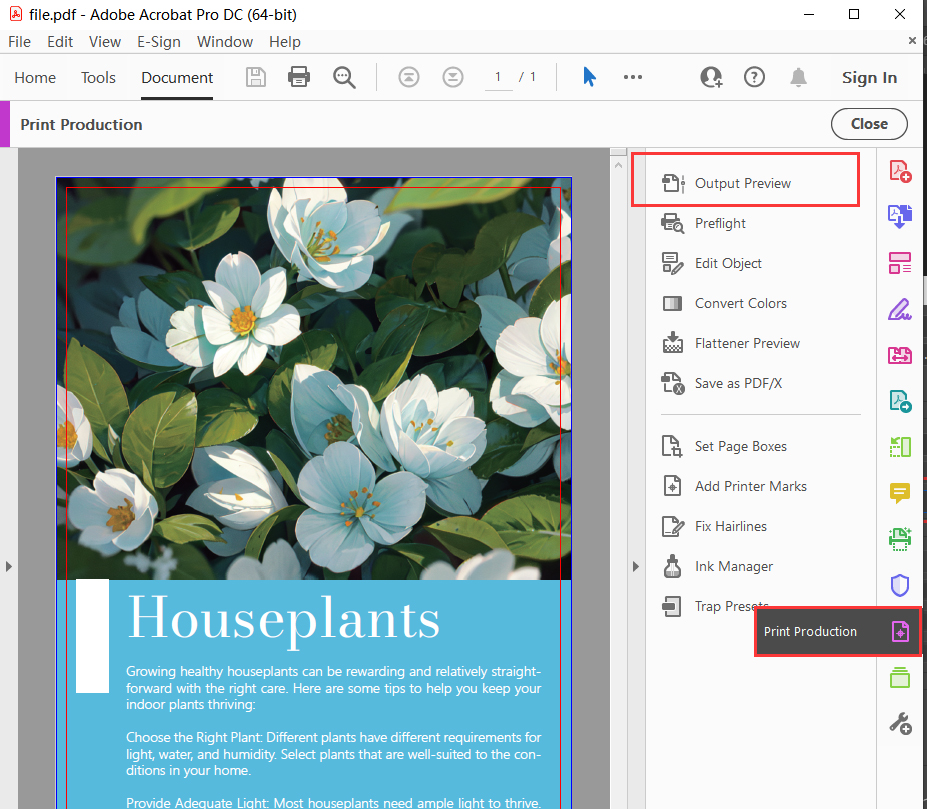
8. To check the resolution of the image, click “Print Production” – “Output Preview”. Under “Preview”, select “Object Inspector”. Click on the image in the document to view its resolution.

How to Create Print-Ready Design Files Using Affinity Publisher?
1. Open Affinity Publisher and navigate to “File” – “New.” In the layout panel, input the desired finished size and choose the correct units. Set DPI to 300. In the Color panel, select CMYK and “Japan Color 2001 Coated”.
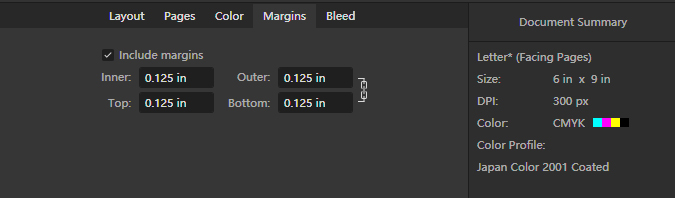
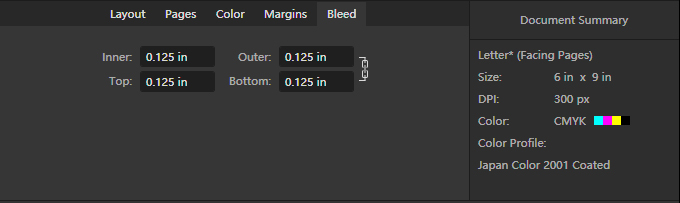
2. In the margin panel, input at least 0.125 inches or 3mm. In the bleed panel, input 0.125 inches or 3mm.
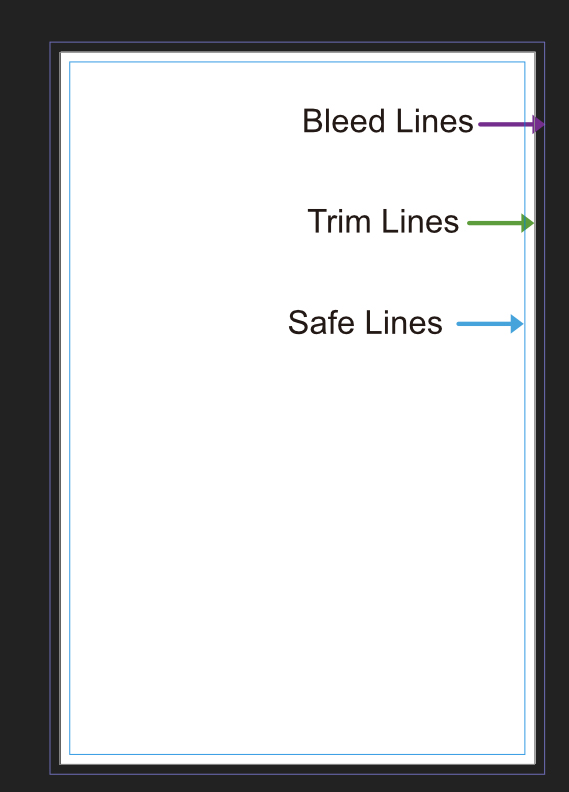
3. In the new document, the white area represents the finished part, while the purple lines indicate bleed lines, and the blue lines denote safety lines.
4. When adjusting colors, ensure to use CMYK. Verify that your images are in CMYK mode and have a resolution of 300 dpi.
5. Extend the background to the bleed lines and ensure important content and text are within the blue lines.
6. After completing the design, select “Export” and choose the save type as PDF.
7. Select “PDF (Press Ready)” and do not check “Embed ICC Profile.”
Open the saved PDF to confirm it includes bleeds. Click on “File” – “Properties” and check the fonts to ensure all have the “Embedded Subset” flag.
How to Create Print-Ready Design Files Using Canva?
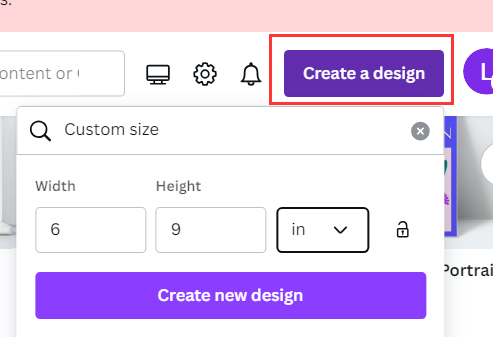
1. Open Canva and click on “Create a Design”. Enter the desired finished size and choose the correct units.
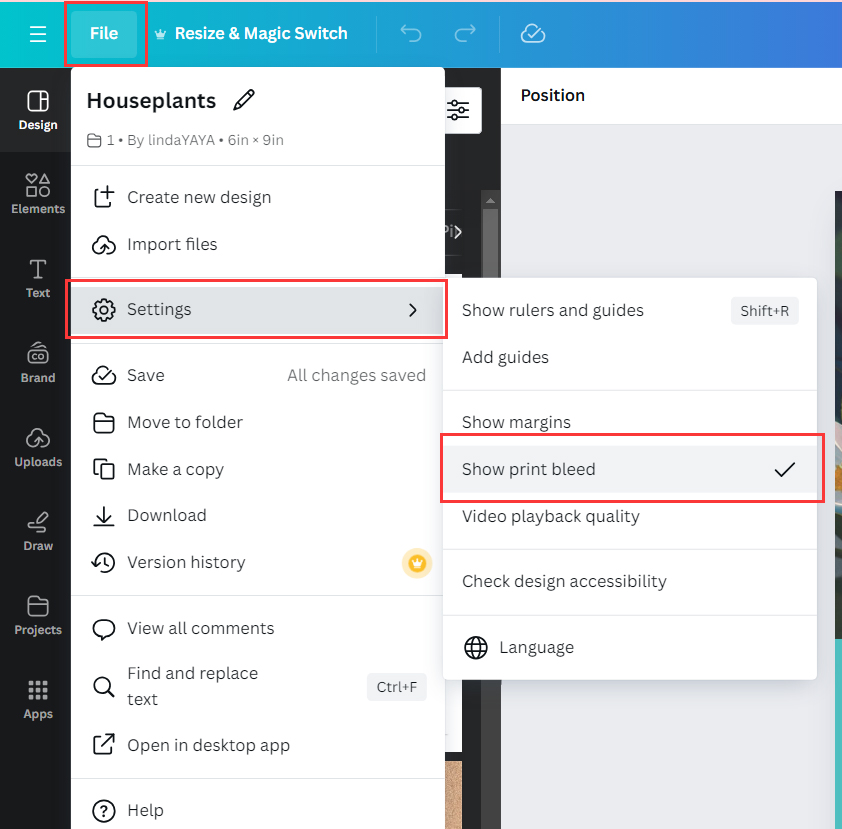
2. In “File-Settings”, check “Show Print Bleed”.
3. Start designing. When editing colors, use CMYK color hex codes. Make sure all images you use are in CMYK mode and have a resolution of 300 dpi. Extend the background to the bleed area and ensure important content and text are at least 0.125 inches or 3mm away from the trim lines.
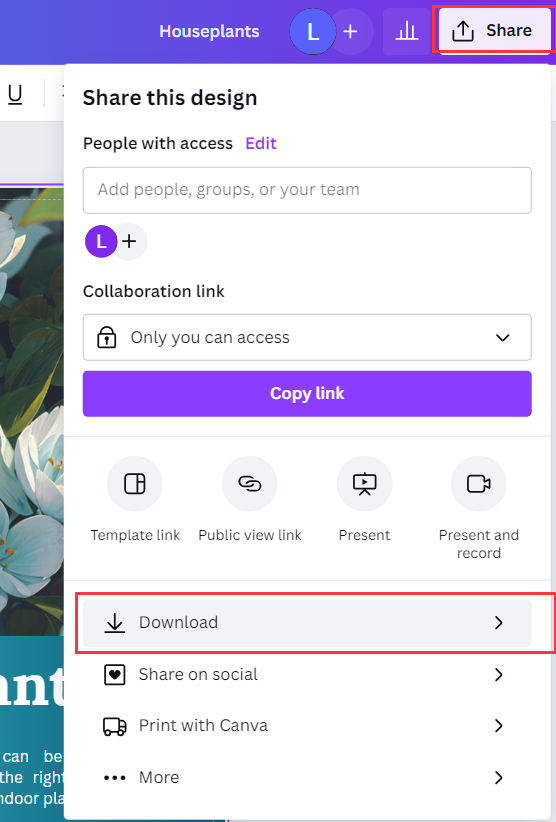
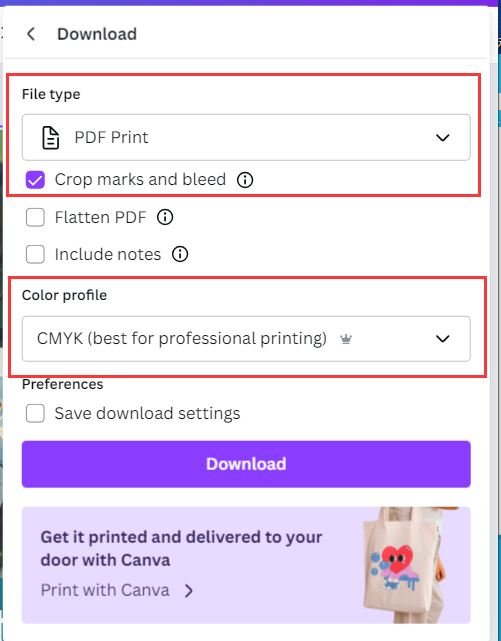
4. After completing the design, select “Share” and then “Download”. Choose the save type as “PDF Print”. Check “Crop Marks and Bleed” and select CMYK as the color profile. Click on “Download”.
5. Open the downloaded PDF and ensure the size includes bleed. Click on “File-Properties”, check the fonts, and ensure all fonts have the “Embedded Subset” flag.
How to Create Print-Ready Design Files Using QuarkXPress?
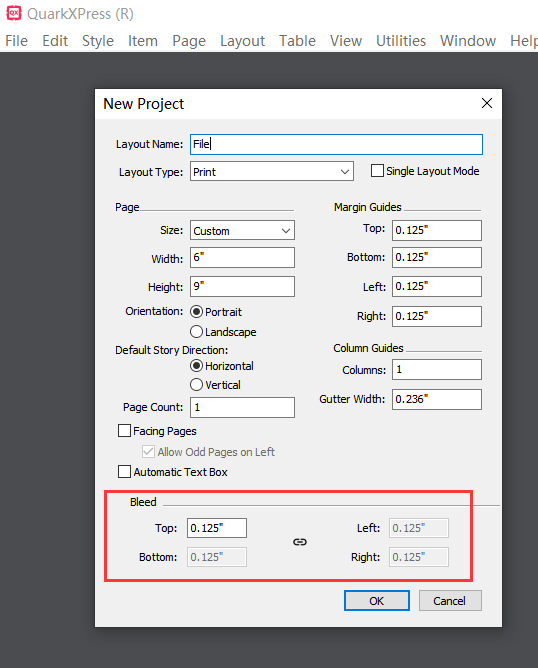
1. Open QuarkXPress and click on “File” – “New Project”. Enter the desired finished size. Input at least 0.125 inches or 3 mm for the margins, and 0.125 inches or 3 mm for the bleed.
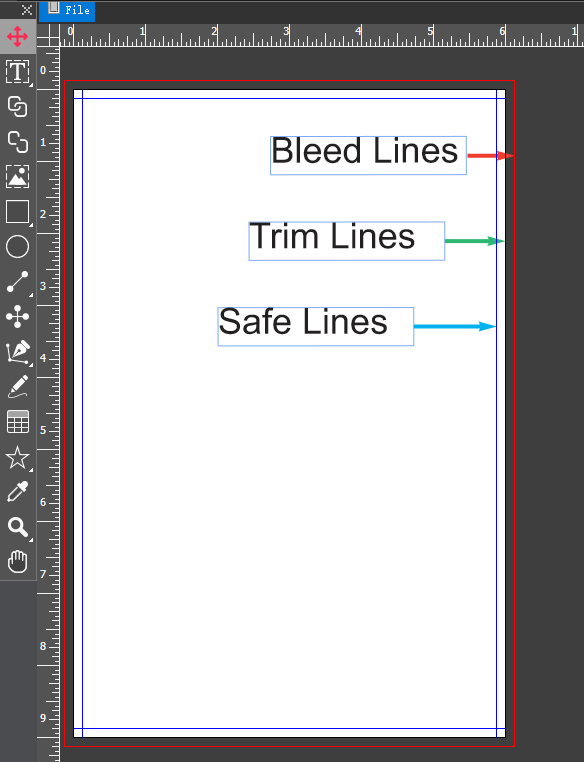
2. In the new page, the white area represents the finished part, the red lines indicate the bleed, and the blue lines represent the safe area.
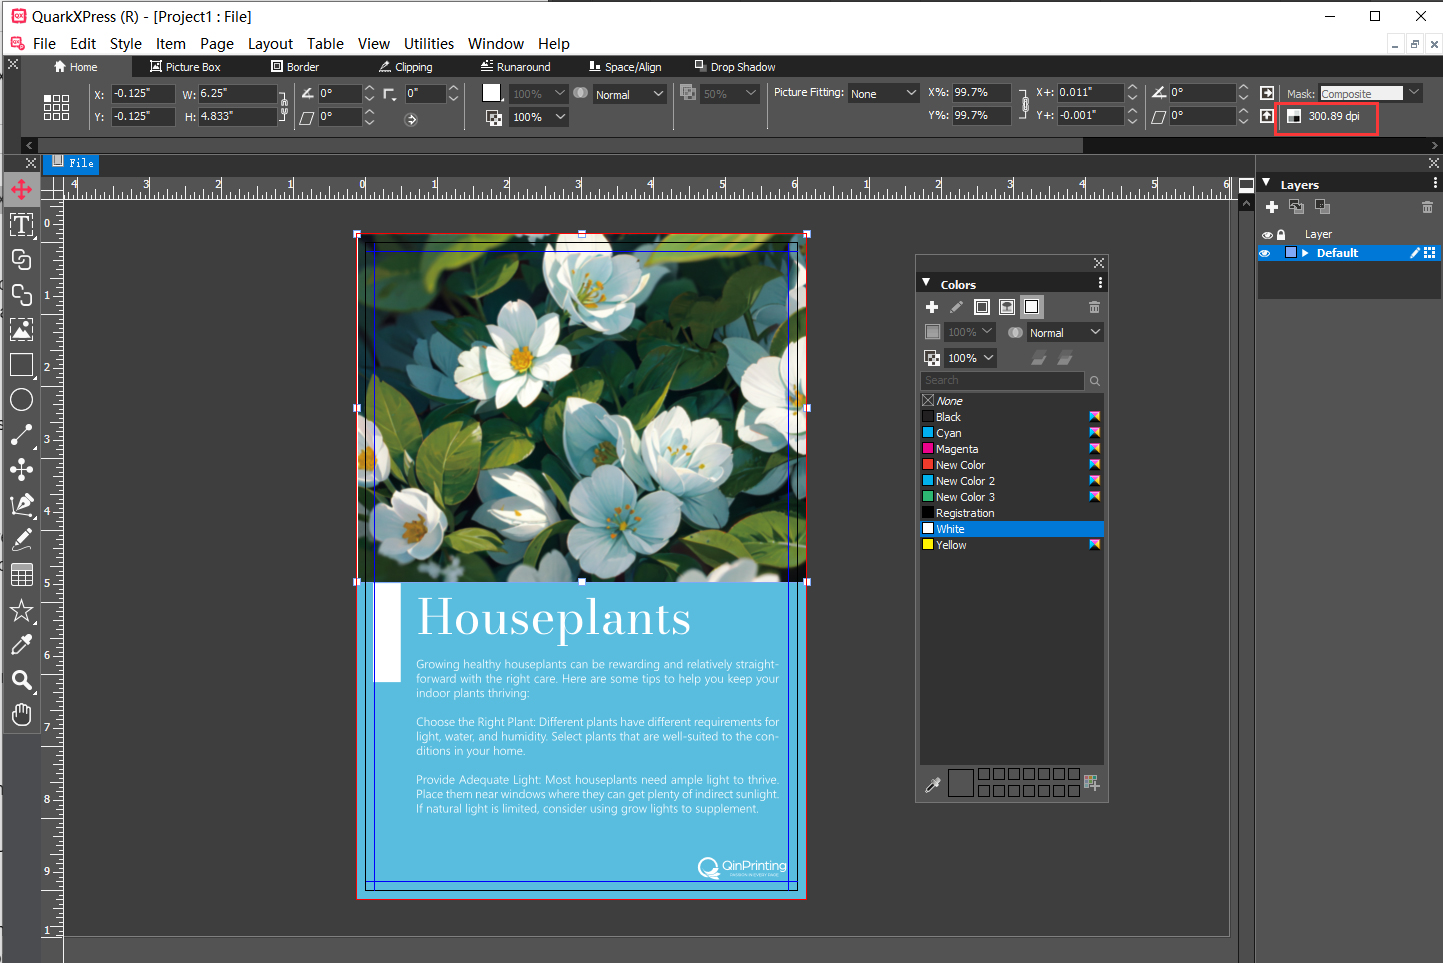
3. When editing colors, use CMYK color mode. Ensure that all images are in CMYK mode and have a resolution of 300 dpi. You can check the current effective image resolution in the picture box panel.
4. Extend the background to the bleed area and ensure that important content and text are within the safe area.
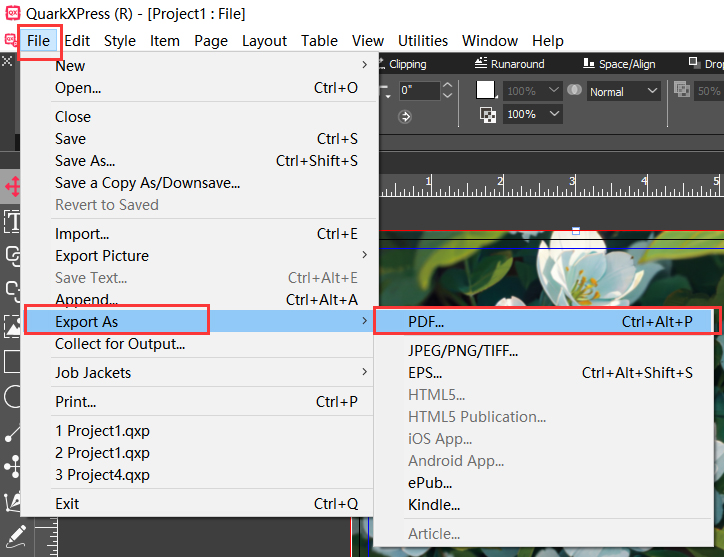
5. After completing your design, select “Export as” and choose PDF. In the popup window, click on “Options”.
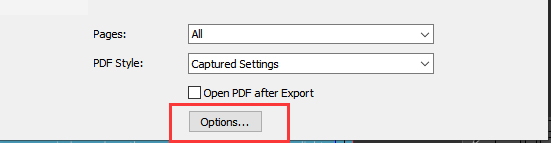
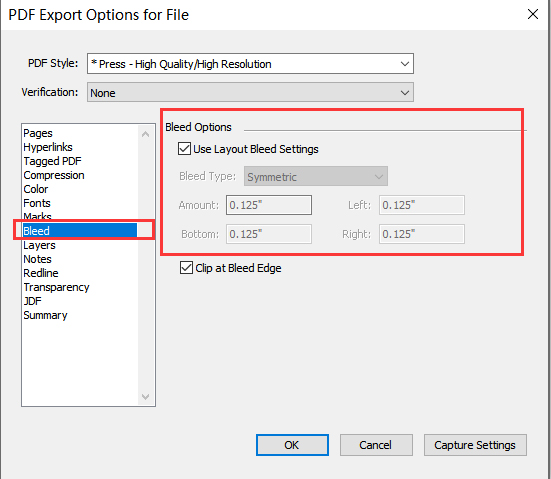
6. In the options panel, select “Press – High Quality/High Resolution”. Under “Marks”, choose “Mode – Off”. Under “Bleed”, select “Use Layout Bleed Setting”.

7. Open the saved PDF file and ensure that the size includes the bleed area. Click on “File” – “Properties” to check the fonts, and ensure that all fonts have the “Embedded Subset” flag.