Custom Card Decks
 Custom Holographic Cards
 Folding Cartons
 Rigid Boxes
 Corrugated Boxes
 Custom Board Game
 Kickstarter Print Solutions
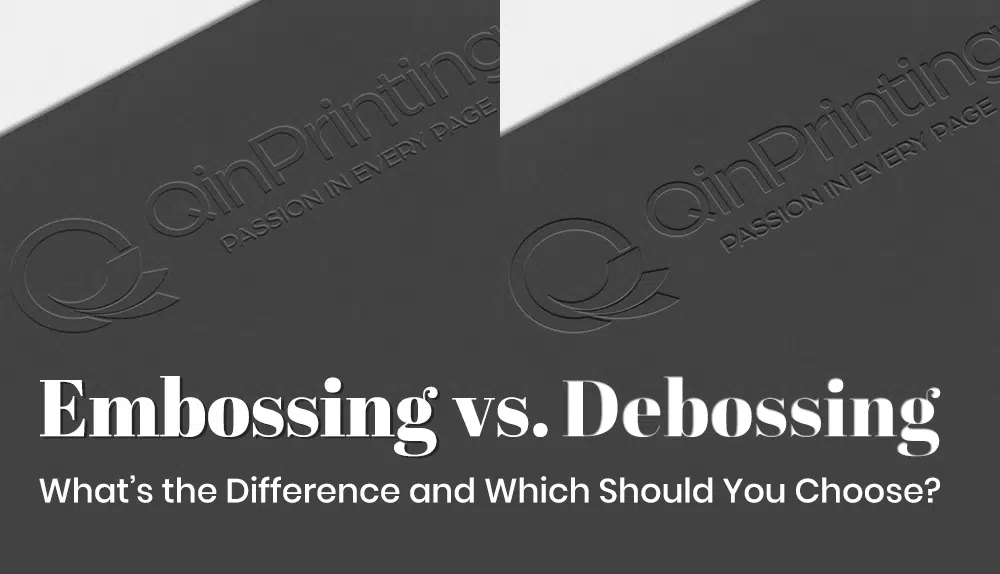
Pick up an art book, a premium whisky box, or a luxury hardcover Bible and run your finger across the cover. Chances are you’ll feel something — a raised title, a pressed-in logo, or a subtle texture that sets it apart from an ordinary printed surface. That’s embossing or debossing at work, and once you know the difference, you’ll notice it everywhere.
Both are die-based finishing techniques that add dimension and tactile quality to printed materials, and both are applied without ink in their most common form. But they produce opposite effects — and choosing between them can make a real difference to how your finished piece reads.
This guide explains exactly what embossing and debossing are, what materials they work on, and how to decide which is right for your project.
What Is Embossing?
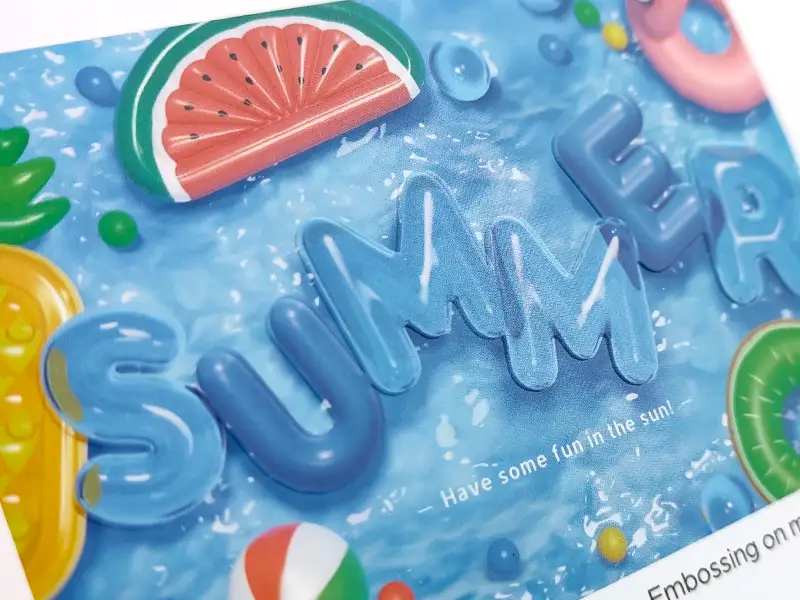
Embossing raises a design element above the surrounding surface. The effect is created by pressing the material between two custom dies — a raised metal die and a recessed counter-die — forcing the paper, board, or cover material upward into a three-dimensional shape.
The result stands proud of the surface — visible and tactile, catching light and casting shadow in a way flat printing cannot replicate.
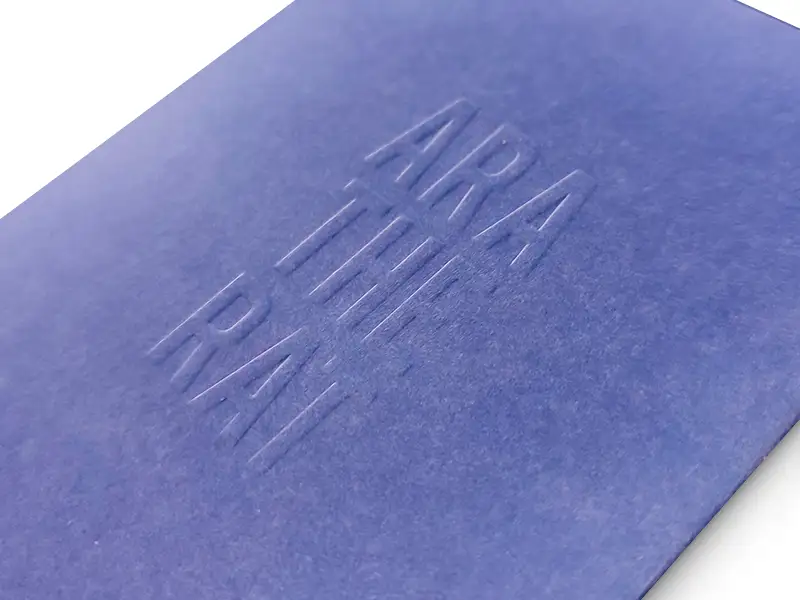
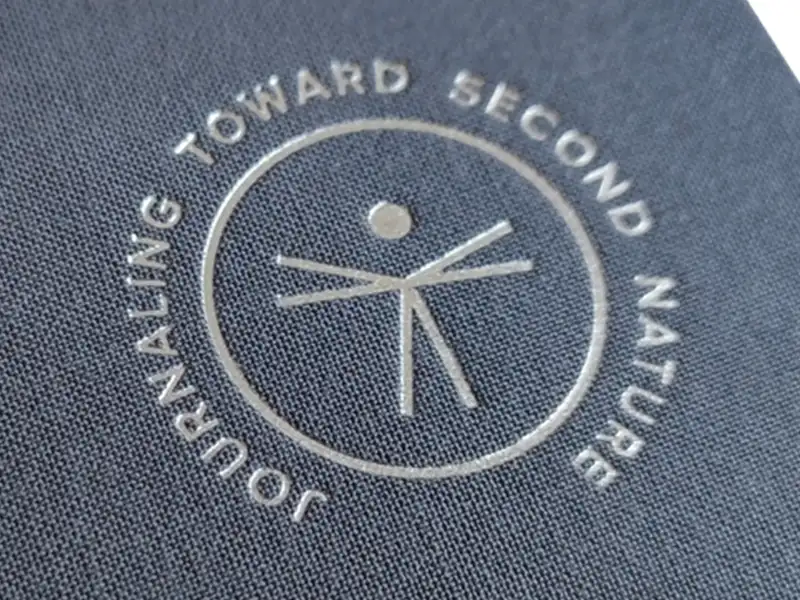
Blind embossing – applies the raised effect without any ink or foil on top — a subtle, tonal finish where the texture itself is the statement.
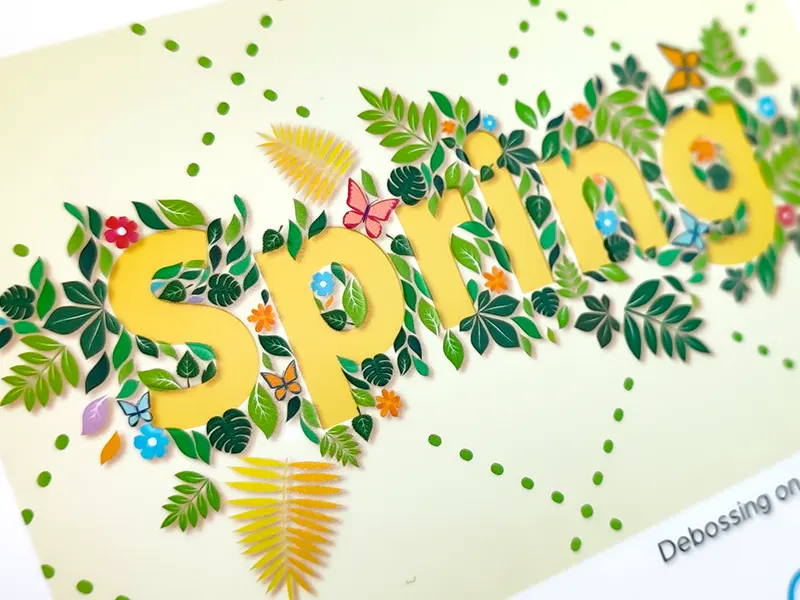
Printed embossing – combines the raised effect with printing underneath it, giving both color and dimension.
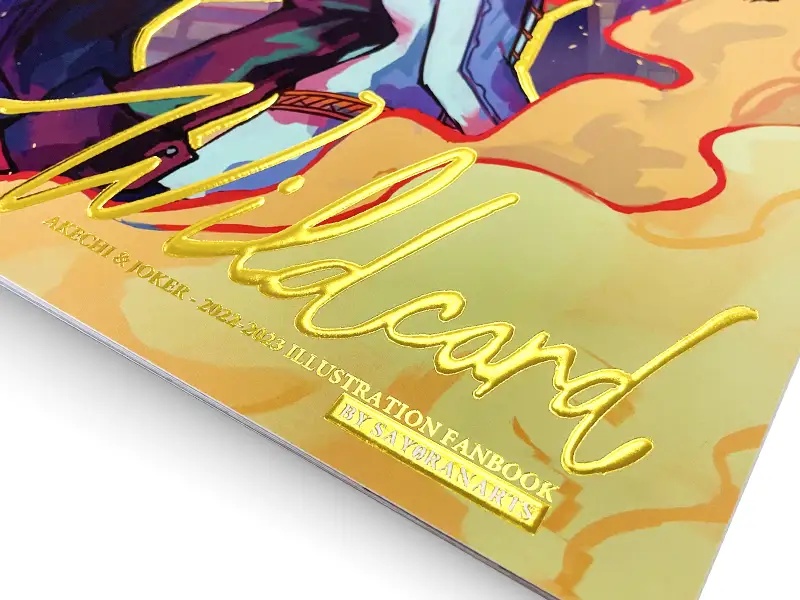
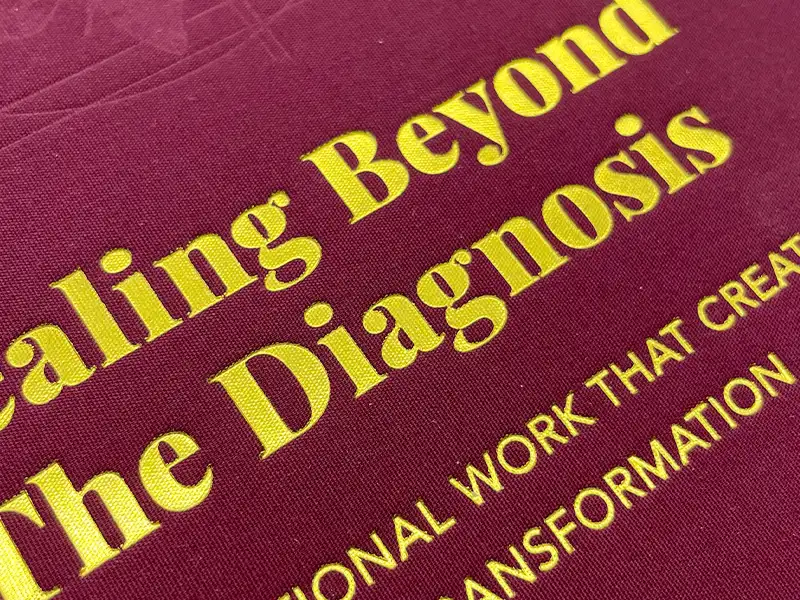
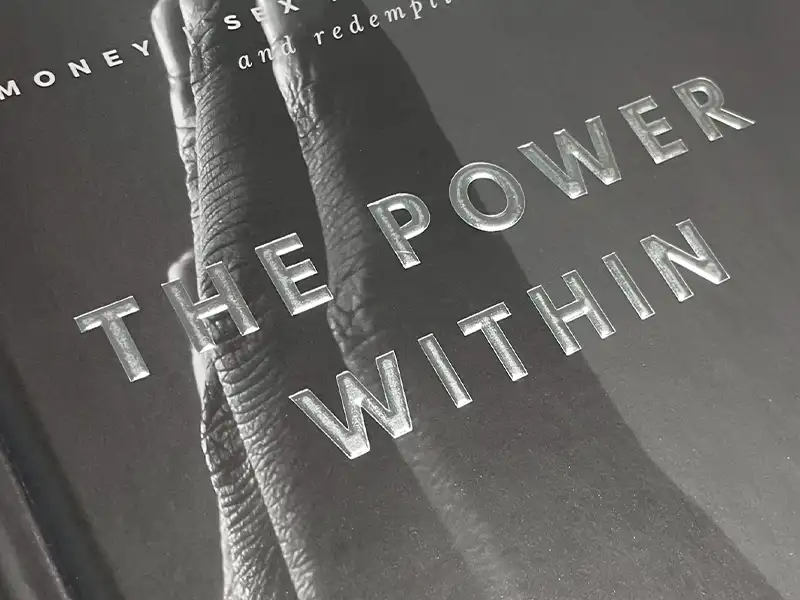
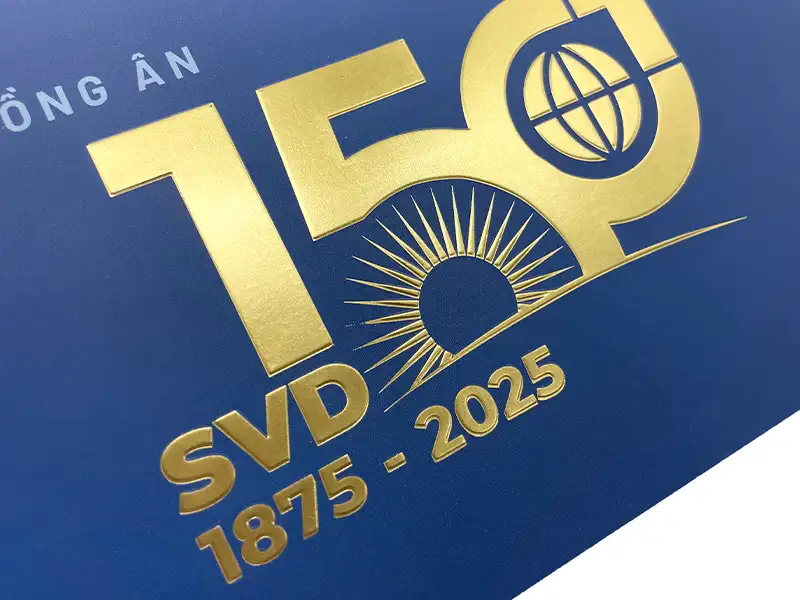
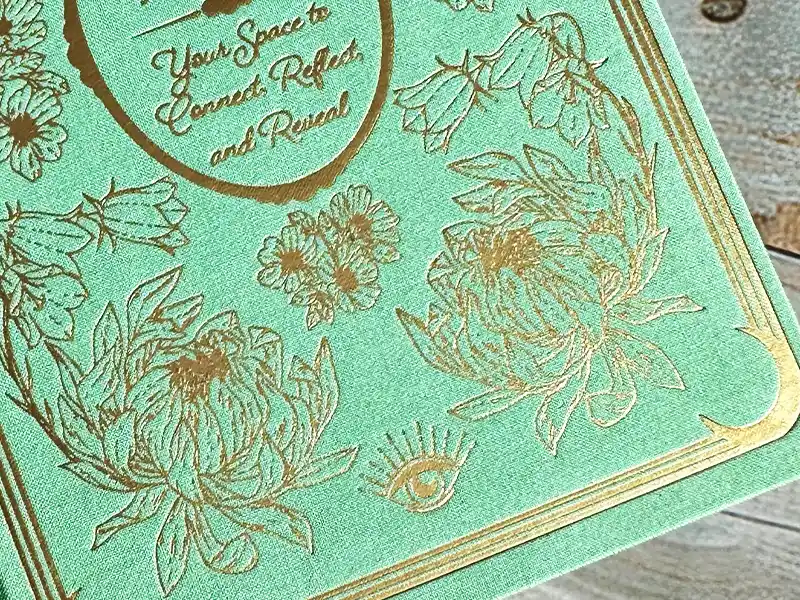
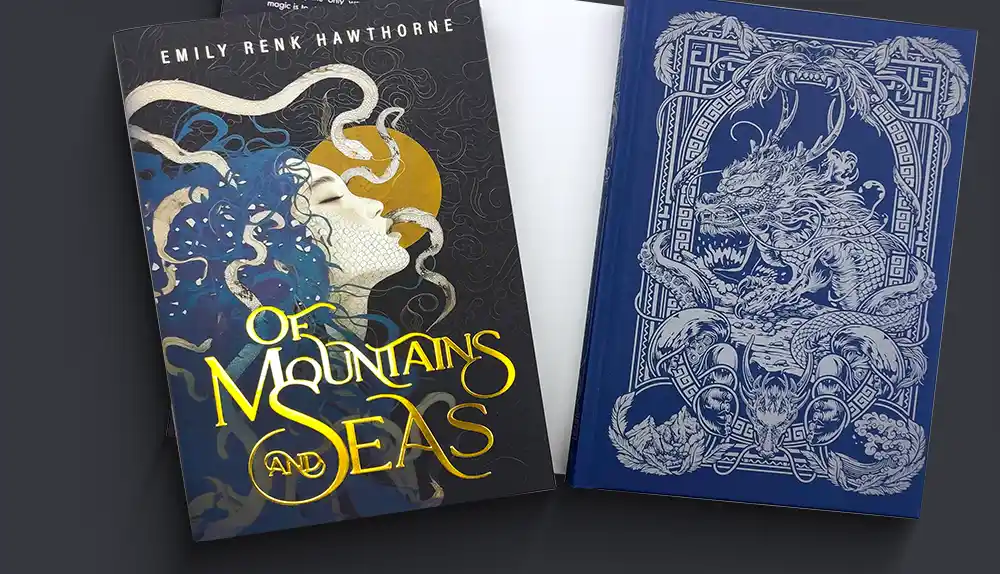
Foil embossing – (also called embossed foil or sculptured foil) adds a metallic or pigment foil layer on top of the raised area — one of the most visually striking combinations available.
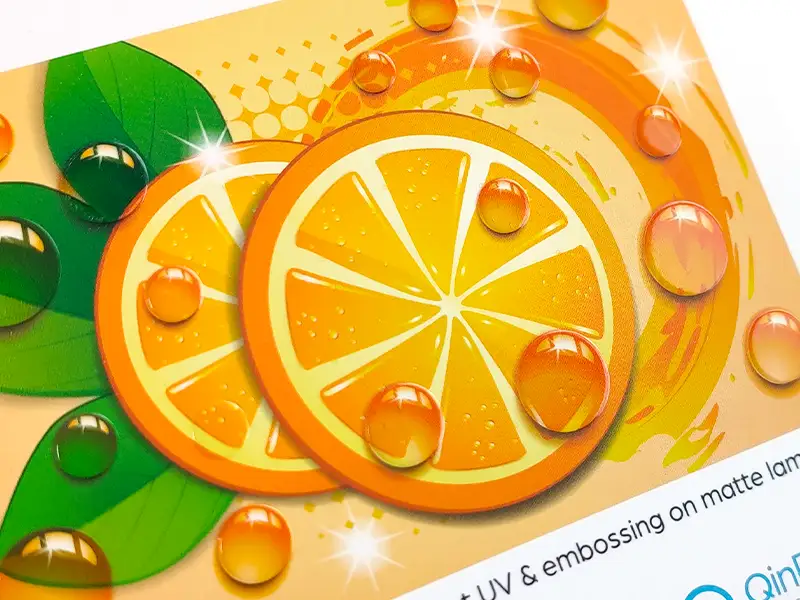
Spot UV embossing – combines spot UV coating with embossing on the same element. Because a cured spot UV layer already sits slightly above the surrounding surface, adding embossing underneath amplifies the lift — the result is a more pronounced, three-dimensional raised effect than embossing alone can achieve.
Embossing is at its most effective on focal elements — a title, a logo, a central graphic — where the eye is already drawn.
What Is Debossing?
Debossing is the reverse of embossing: a metal die is pressed down into the surface from above, creating a recessed impression that sits below the surrounding surface rather than above it.
The visual effect is quieter than embossing — light grazes across the indentation rather than bouncing off a raised edge, giving the finish a softer, more refined character that reads as intentional restraint.
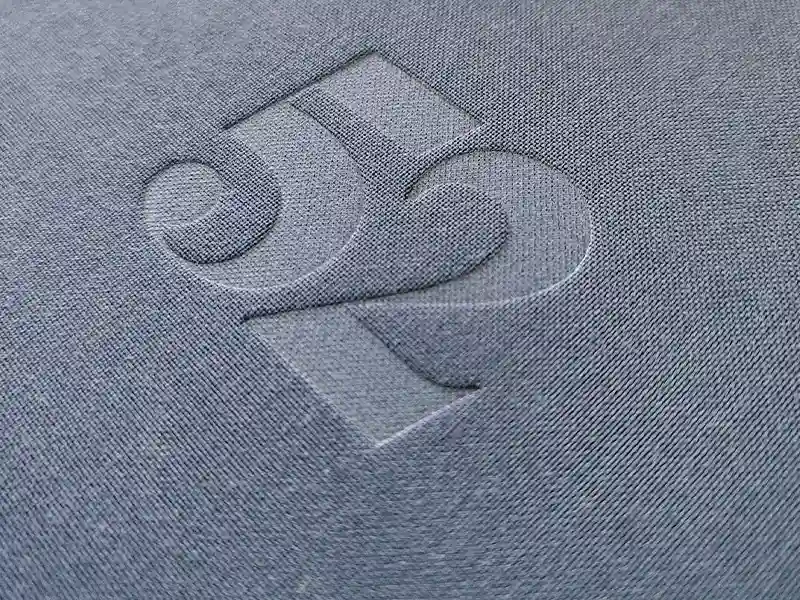
Blind debossing – relies on the impression alone — no ink, no foil — letting the material speak for itself.
Printed debossing – adds color beneath the recessed impression.
Foil debossing – layers a metallic or pigmented foil directly over the impression, introducing sheen and richness while preserving the tactile quality of the press.
Debossing works especially well as background texture (a repeating pattern pressed across a cover area), as a frame or border element, and for designs where the goal is luxury through subtlety.
Embossing vs. Debossing: Side-by-Side Comparison
| Embossing | Debossing | |
|---|---|---|
| Effect | Raises design above the surface | Presses design into the surface |
| Visual feel | Bold, prominent, three-dimensional | Subtle, refined, understated |
| Light behavior | Catches light, creates shadow at base | Light grazes across the indentation |
| Best for | Titles, logos, central focal elements | Background texture, borders, luxury tone |
| Works on | Coated paper, cardboard | Cardboard, cloth, leather |
| With foil stamping | Very popular combination | Very popular combination |
| With Spot UV | Compatible | Not Compatible |
| With lamination | Works well | Works well |
| Cost | Similar — both require custom dies | Similar — both require custom dies |
What Materials Can Be Embossed or Debossed?
Not every material accepts embossing and debossing equally — some support only one technique, and a few support neither. The table below shows compatibility at a glance; the notes that follow explain the less obvious restrictions and the reasons behind them.
| Material | Embossing | Debossing |
|---|---|---|
| 157 Coated paper + lamination, mounted on greyboard | ✓ Yes | ✓ Yes |
| Paper ≥250 gsm, with or without lamination | ✓ Yes | ✓ Yes |
| Textured uncoated paper ≥120 gsm | ✓ Yes | ✓ Yes |
| Fabric wrapped on greyboard | ✕ No | ✓ Yes |
| Faux leather wrapped on greyboard | ✕ No | ✓ Yes |
| Coated paper under 157 gsm, no lamination | ✕ No | ✕ No |
| Heavily textured paper | ✕ No | ✕ No |
| Paper over soft foam or sponge padding | ✕ No | ✕ No |
| Plastic or polypropylene covers | ✕ No | ✕ No |
| Spot UV-coated paper | ✓ Yes | ✕ No |
Fabric and faux leather: deboss only. Embossing requires the substrate to push back upward against the die and hold a raised profile. Textile surfaces are too pliant to do this — their fibres relax once pressure is released, producing an indistinct result rather than a crisp raised edge. Debossing works on both because the die simply presses downward, and the rigid greyboard underneath provides the stable support needed for a clean impression.
Thin coated paper needs lamination. Coated paper below 157 gsm lacks the structural rigidity to hold a clean impression on its own. Lamination adds the surface hardness and stiffness the technique requires; without it, the coating tends to crack at the die edge or produce a blurred result. Mounting on greyboard provides additional support.
Spot UV is compatible with embossing, not debossing. The reason comes down to which side of the material the die acts on. With embossing, the die presses upward from the reverse side of the material — it never contacts the spot UV coating on the face, so the cured layer is left undisturbed. With debossing, the die presses downward from the front, directly into the spot UV surface. Because the cured UV coating is hard and brittle, the die pressure cracks it at the impression edge. The opposing directions of the two effects — spot UV raising the surface, debossing pressing it inward — compound the problem further, making the combination unworkable.
Foam or sponge padding rules out both techniques. Soft cushioning beneath the cover board absorbs die pressure before a sharp, consistent impression can form. This applies to both embossing and debossing.
Which Should You Choose?
Neither embossing nor debossing is inherently “better” — the right choice depends on your design goals, the material you’re using, and the impression you want to make. Here’s a practical guide:
Choose embossing when…
- You want maximum visual impact — embossing is more prominent and eye-catching than debossing.
- You’re highlighting a focal element: a title, a logo, or a central graphic that you want the eye drawn to immediately.
- You’re combining the effect with foil stamping — foil embossing is one of the most popular premium combinations for book covers and packaging.
- Budget is a consideration and you can only choose one finish — embossing tends to deliver a higher visual return on a single element.
Choose debossing when…
- You want a luxury feel through restraint — debossing communicates sophistication without demanding attention.
- You’re working with cloth or leather, where the recessed impression suits the material’s natural character.
- You’re creating a background texture — a repeating debossed pattern across a cover area is a popular technique for premium hardcover books and rigid gift boxes.
- Your design is minimal and the cover material itself is the star.
When the choice isn't clear…
If you’re genuinely unsure, ask two questions: does the element need to stand out, or settle in? And is the surrounding surface busy (where debossing creates calm) or plain (where embossing adds interest)? You can also request a sample proof of both options before committing to a full print run.
Can You Combine Embossing and Debossing?
While it is technically possible to combine embossing and debossing, we do not recommend applying both on the same plane. Because they are opposite techniques, using them together in the same area can make both the raised and recessed effects less pronounced, reducing the visual impact.
However, each technique can be combined with other finishes such as foil stamping or spot UV, which often produces even more striking results — the kind of premium cover we produce every day with our foil stamping book printing. For example:
A debossed background pattern paired with spot UV accents on logos or borders.
An embossed title enhanced with gold foil on a plain cover.
By applying embossing or debossing separately and combining each with complementary finishes, you can enhance depth, texture, and premium appeal while keeping each effect clear and distinct.
Book Printed by QinPrinting
Design Tips for Embossing and Debossing
Review these guidelines before finalizing your artwork. Following them will save time in pre-press and ensure the best result from production.
Minimum line and stroke width
Do not use lines, strokes, or text outlines thinner than 1.5pt for debossing on fabric or faux leather, 1pt for embossing or debossing on paper. Anything thinner risks not registering cleanly in production.
Minimum element size
Individual emboss or deboss elements should be at least 2mm wide or tall. Fine serifs on small text and thin decorative borders will not reproduce cleanly, particularly on cloth or leather. For text in finish areas, use a bold or heavy weight sans-serif font at 12pt or larger where possible.
Keep cloth and leather designs simple
The most common design mistake on cloth and leather covers is too much detail. The material stretches slightly under die pressure and cannot hold sharp fine detail. Bold shapes, clean lettering, and generous spacing always work better than intricate patterns on these materials.

Book Printed by QinPrinting
How to Get Your Files Ready
Both embossing and debossing use the same two-file system: your main print file (full artwork in CMYK) plus a separate mask file that tells us exactly where to apply the finish. The mask file must contain only vector shapes, filled with a named Spot Color swatch (not a CMYK color).
Name your spot color swatches exactly as follows: Emboss for embossing, Deboss for debossing. The mask file and the print file must be exactly the same size and perfectly aligned.
-
Full file preparation guide
For complete step-by-step instructions covering Adobe Illustrator and Adobe InDesign, spot color naming, PDF export settings, and a pre-submission checklist, see our file preparation support page.
Frequently Asked Questions
Is embossing or debossing more expensive?
Both require custom dies, so costs are comparable. The die is a one-time setup fee; per-unit costs on longer runs are relatively low. Price is more affected by the number of finish areas and die complexity than by which technique you choose. Contact us with your artwork for an accurate quote.
Can embossing or debossing be done in color?
Yes, in two ways. Printed embossing or printed debossing combines the raised or recessed effect with printing underneath the finish area, so the embossed or debossed element carries color. Foil embossing or foil debossing applies a metallic or pigment foil directly over the raised or recessed area — gold foil embossed titles are one of the most popular premium combinations for art books and collector’s editions. Blind embossing and blind debossing have no color at all.
Can I combine embossing and foil stamping?
Yes — one of the most popular premium combinations. The effects can be applied to the same area or to separate elements. A separate mask file is required for each finish; note this when submitting your files and we will confirm the setup before production begins.
What is the minimum order quantity for embossing or debossing?
Our minimum for offset printing with special finishes is typically 100 copies. The die setup cost is fixed regardless of quantity, so the per-unit cost falls significantly at higher quantities. Contact us to discuss the best option for your project.
Can I see a sample before the full print run?
Yes — sample proofs are available. Please note that samples carry an additional cost, as a custom die must be produced specifically for your artwork before any printing begins.
What's the difference between blind embossing and registered embossing?
Blind embossing raises or recesses an area without any ink, foil, or coating on top — the effect is purely tactile and tonal. Registered embossing (also called printed embossing) means the embossed area is aligned precisely with a printed element underneath it, so the raised shape corresponds exactly to the printed image or text. Both are standard options at QinPrinting.
Start Your Project
Ready to elevate your book cover or packaging to the next level? Whether you choose embossing, debossing, or a combination of both with foil stamping and Spot UV, the right finish can transform your design from ordinary to extraordinary. Contact our team today to discuss your project, get a free quote, or request a sample proof — and see firsthand how tactile finishes make a lasting impression.