 Custom Card Decks
 Custom Holographic Cards
 Folding Cartons
 Rigid Boxes
 Corrugated Boxes
 Custom Board Game
 Kickstarter Print Solutions
Designing and printing a commemorative or portfolio book with photos and text can be great fun and very satisfying. Follow our top six design tips to make sure that yours is as beautiful and eye-catching as possible
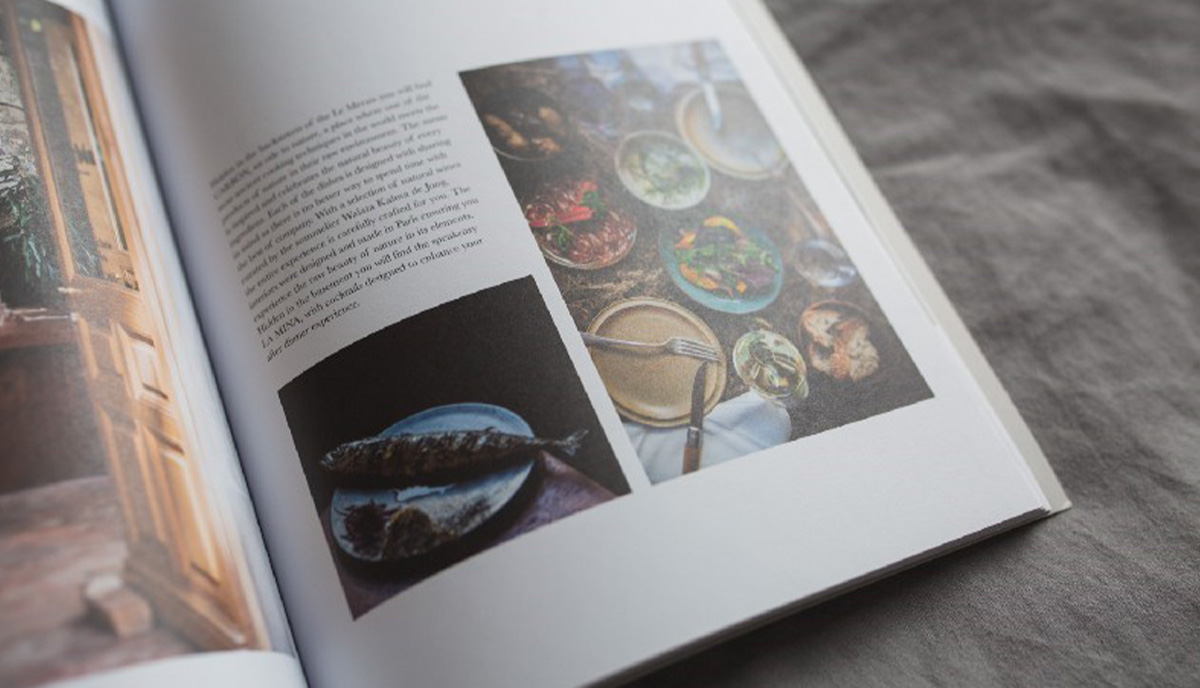
Photo by Salomé Watel on Unsplash
Whether to immortalize family memories, create a portfolio of art or photographic work, as a design project, a corporate promotional tool, or for any other reason, a photo book with text could be a great option. A photo and text book can be either a softcover or a hardcover; in the style of a brochure or a coffee table book; formatted in portrait or landscape sizes; composed of just a handful of pages or hundreds. It all depends on your specific project, your budget, and your creative ambition. But several design and material factors are the same whatever the details. Let’s look at what you need to know to print a beautiful, effective photo book with text.
Photo and text book printing guide in 6 steps
1. Who is your book for?
To create a photo book which satisfies your needs — whether they’re personal, educational, or commercial — means balancing your intentions and the experience of what marketer’s call the “end user”; namely, whoever is going to pick up your book and browse its pages. Focusing on the potential reader from the outset is important; especially if you want to sell your book. So, before you start collating images, writing content, and compiling print files, think with care about who your ideal reader will be and design everything with that person in mind.
2. Go easy on your layout
One of the most common errors we see in files delivered to us for printing is overcrowding the layout with all the images at your disposal and too much text on a single page or two-page spread. We’re not saying that you should only have one image per page. But mix it up and give each picture space to be seen in. An overcrowded layout can mean that none of the images are clear or can command the attention they deserve as the page is too busy with distractions as the reader’s eye jumps about not knowing where to focus attention. Leave white space around the images and organize them in such a way as to lead the eye to a central point of attention. Where text is included try to keep it separate from the images themselves. If you must overlay text, be careful that the colors and fonts won’t make the words too hard to read. Spreads with the text on one side and the photos on the other work best.
3. Tell a story
Your photo book should have a clear theme which links all the images in some way. Don’t just arrange the photos because of artistic considerations such as color schemes or lighting, or for purely practical reasons such as size or shape. Plan each image in advance and experiment with the sequence so that it suggests a meaning in the mind of the viewer and leads them on a satisfying journey of discovery as they turn the pages. Likewise with the text. Give a lot of thought to the words that will accompany the images and weave them into the overall “narrative” that the photos communicate.
4. Variety is the spice of life
While you should aim for consistency with your style — so framing, font choices, narrative progression, and so on — it’s a good idea to choose several different layouts and swap them out across the pages and spreads in the book. The reader needs to experience a balance between consistency and pleasant surprises. If all the layouts are the same on every page — say, large landscape orientation across the top and two portrait-oriented images side-by-side beneath with the images always on the right and the text always on the left — the reader’s brain will switch off and they’ll lose concentration as they think they “know what to expect”. So, varying the layouts helps make the book more interesting and holds the reader’s attention for longer.

5. Chapters, and introduction, and an index
If your book is very short — more of a booklet or even a brochure — then you don’t need to think about breaking it up into chapters or writing an introduction and including an index. But if it’s a longer work with more than 50 pages or a few hundred pages, then chapters, an introduction, and an index make the organization more logical, the reading experience easier, and the overall sense of the professionalism and completion of the book much stronger. If you’ve taken our advice to build some sort of storytelling — a narrative structure — into your design, then the chapter divisions will most likely suggest themselves following the logic of the narrative grouping and chronology of the images. The introduction should be mostly about the book itself, its inspiration, background, and purpose. If you want to add short author and photographer biographies, too, why not? But they’re usually better positioned at the end of the book, between the end of the final chapter and the index. Indexing is a complicated business and is best left to a professional indexer. A quick search online will lead you to any number of reputable indexers whom you can engage for the project.
6. Preparing your files for printing
Even if you are handling all the layout and design aspects yourself, unless you are a qualified and experienced designer, it’s a good idea to send your raw files to a professional designer to get them “print ready”. There’re lots of technical considerations for which your artwork and text layouts may need adjusting. For example, trim, bleeds, spine width, color space, binding style, and more. We’ve written a useful guide to getting files ready for printing which you can read here and it’ll give you a good grounding in all these terms and technical aspects. At QinPrinting, once we receive the files, we’ll manually check them to make sure everything is in order and let you know if anything needs to be changed before we go to press. But you can avoid any unnecessary delays by making sure your files are print ready in advance.
Your printer can do more than just print
We encourage all our clients to get in touch early on in the process. Why? Because we have over 25 years of industry, technical, and customer care experience helping people just like you to create stunning photo books. We can advise you on all aspects of design, materials choices, covers, finishes, binding, and more for your photo and text book printing project. Our aim is to be the best in the industry. We’re a small team with a “family atmosphere” but we combine that with a passion for print and polished professionalism that you can rely on every step of the way.
So, get in touch and let’s chat about your ideas. Talk is free and one of our expert team will be delighted to collaborate with you to flesh out your basic idea and discuss the various options available in terms of printing and delivery. Then, as soon as you’re ready, we can put it all together and give you a no-obligation quote so that you know exactly what to expect before we get started on the work. We look forward to working with you and helping you create a truly unique and eye-catching photo and text book.


2 thoughts on “6 Design Tips for Your Photo and Text Book Printing Project”
I am looking to publish a book of stories with photos
there are 5 chapters containing and 30 stories each story has 3 to 5 pictures.
I suspect the entire project will be 150 to 160 pages.
soft cover is perfered.
we can go 5 x 7 or larger which ever is least expensive.
Hi Howard, great to hear from and this sounds like a project we can certainly help you with. Looks like you have a clear vision of what you want which is an excellent starting point. We've asked one of our team who specializes in book printing to contact via email, so look out for that in your inbox (and check spam/ junk just in case!). We look forward to working with you on your book. 🙂