 Custom Card Decks
 Custom Holographic Cards
 Folding Cartons
 Rigid Boxes
 Corrugated Boxes
 Custom Board Game
 Kickstarter Print Solutions
10 steps to take you from getting an idea to a printed comic book ready to self-publish and sell
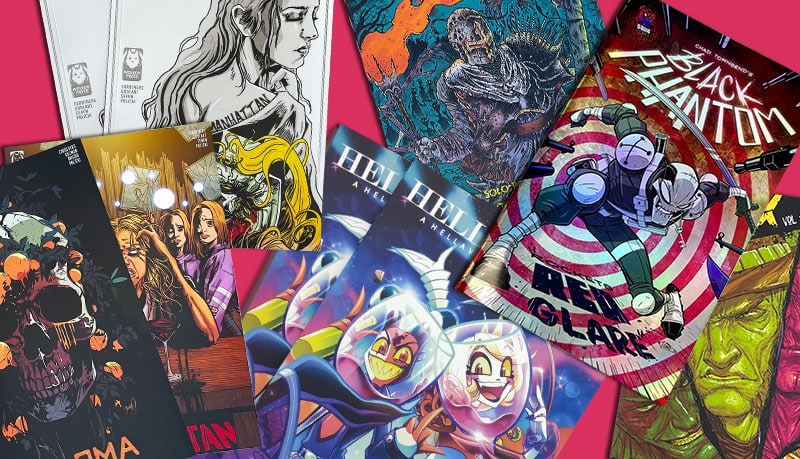
If you want to learn how to plan out a comic book and everything that’s involved in doing so, from getting an idea, to writing the script, to developing the drawings, coloring, and layout, to choosing the paper and binding for printing, you’re in the right place. At QinPrinting, we work with mainstream and independent comic book creators every day and have printed comics and graphic novels for the likes of Juanjo Guarnido (Blacksad), Chad Townsend (Black Phantom / Batman / Iron Man), and indie enterprises like Wolven Press alongside a host of talented comic book artists and writers who may not be globally famous but you’d recognize from the bookstores and conventions.
Comic books are unique in literature. They have something in common with other narrative books — like novels and short story collections — but more in common with animated movies. You may have heard that we divide novelists into two kinds, called “planners” and “panthers”. Planners write detailed outlines of all their characters, settings, and events before they write up the story. Pantsers just start writing and “fly by the seat of their pants” until they get to the end. But with how to plan out a comic book, you need to plan.
Writing a comic book script is much more like being a screenwriter than a novelist. You’re mostly working with directions and dialogue. Words play a supportive role while it’s the images which tell the story, like in an animated movie.
In traditional text-based novels, the words do all the storytelling; describing the action and giving insight into the thoughts and feelings of the characters. Any drawings are mere “illustrations” that highlight key moments in the story, and that’s all.
In a comic book, the pictures do most of the storytelling work—it’s known as “sequential art”—and we pare the text down to necessary directions to speed things up, switch scenes, highlight dialogue, or express a character’s thoughts. Here are some classic examples:
- Speed things up: “Two weeks later…”
- Switch scenes: “Meanwhile, back at headquarters…”
- Highlight dialogue: “Watch out!”
- Express a character’s thoughts: “I’ll play along for now, but I gotta find a way outa here…”
In a traditional novel using words as the main storytelling medium, you can overwrite, go with the flow, and then come back later and cut out the excess, editing down to exactly what you want to say. You have less room to maneuver in a comic book script. You’ll still need to edit, however much you plan. But you will definitely need to plan.
So, to help you get started with how to plan out a comic book, we’ve compiled these 10 steps you can follow. We’ve based these steps on a distillation of what we’ve learned from almost 30 years in the business, coupled with conversations with our most talented and experienced comic book creators, both mainstream published and independent creatives. So, this is not information scraped from other blogs and hearsay. This is solid, practical advice drawn (pardon the pun!) from professional experience and best practice. We’ve also organized these steps so that they’ll take you in a logical sequence from getting a good idea for your story, to working out who your key characters are, the setting, and the inner and outer plot arcs, to storyboarding, adding text and dialogue, finalizing the artwork, and getting your comic book printed. It’s a succinct but comprehensive zero-to-complete guide to all the essentials you need to plan out a comic book. Let’s get on with it, then!
1. How to get ideas for a comic book
You may already have more ideas for your comic book story than you could swirl a heroic cape at, but it’s always useful to have a few extra concepts to play with. Ask any comic book creator and they’ll tell you that ideas can come from anywhere. Most professional comic book writers don’t have a problem coming up with ideas for stories so much as choosing which one to plan out next. But it can take time to “get the knack” of recognizing a good story idea. And even the most experienced pros find themselves stuck from time-to-time. But here are a few great ways to get ideas for a comic book storyline:
- Read a lot of comic books, think about the stories and ask yourself, “But what if this had happened instead of that?” You use a story that’s already been written as a springboard to discover a new story by thinking about how things would have run if something had been different.
- When you watch the news on television or read the papers, keep a look out for unusual events, news stories, mysteries, crimes, or anything that might spark an idea for a comic book story. Again, asking “What if…?” is always a great way to start.
- When you go for a walk, or in the store, or you’re riding the bus to work, or any other moment when you can find a few minutes thinking time among strangers, do some thought experiments. Look around you at the other people. Choose someone who looks interesting and begin to invent a personality, a life story, and a back history for them based on their looks, their clothes, how they’re behaving, and so on. Where do you think they might go? What secrets might they have? What might be their burning desire or highest ambition be? Now take that character and put them in a totally contrasting situation. Say, the office clerk who dreams of being a pilot, finds herself suddenly caught up with an international crime ring through a case of mistaken identity; or the ex-cop going to take his grandkids out to the zoo finds their parents’ house empty, everything roughed over, and the door left open; or the kid headed to the skate park, sees a mysterious box left in the subway, he opens it and finds…
You can come up with ideas by reading, watching movies, day-dreaming, talking to friends, observing strangers, remembering past events, and always asking, “But what if…?” Most of us have ideas all the time. Neil Gaiman, author of Coraline, Sandman, and other famous comics, once said that everyone has ideas for stories and the only difference between a writer and anyone else is that the writer notices when an idea pops up. Teach yourself to notice when an idea comes along.
2. Write before you draw
Look, if you get a character or setting or scene idea and you want to start a few rough sketches, go ahead. But you need to get the structure and all the essential elements of your story planned out and written before you draw. It’s a lot easier to rewrite a few sentences in a comic book outline than it is to redraw several panels of painstaking artwork! And until you’re sure your story will work, don’t waste time on the art.
So, what are the essential elements of a good comic book story? They’re the same as any other narrative form, any other storytelling medium. Let’s look at them now, and what you need to know to be confident of how to plan out a comic book that has a story people will want to read; that will keep them turning the pages.
A protagonist:
This is your heroine or hero character — the person whose story you’re telling. To make them interesting, you’ll need to work out who they are, what their biography has been so far, what they believe, where they live, what they do, what their values are, what their goals in life are, who their friends and enemies may be, what motivates them, what they’re afraid of, and what flaws they have in their personality, the kinds of ways they goof up.
The most important facets of your protagonist that you need to define clearly are:
Goal:
This is a ‘big picture’ desire; it’s what your character wants out of life. It’s usually a big concept word like love, power, security, revenge, and peace.
Motive:
This makes them who they are and explains why they act as they do. Maybe their motive is to make others happy, maybe it’s avoiding trouble, maybe it’s seeking justice, or to be liked, or to protect the weak, or to be admired, or…
Flaw:
It’s essential that your protagonist isn’t perfect. A perfect protagonist is one that nobody can relate to and has no weak point where the antagonist can hurt them. Your protagonist’s flaw could be that they find it hard to trust anyone, or that they’re afraid of snakes, or can’t relate to kids, or suffer from doubt or indecision when the pressure’s on.
The antagonist:
The heart of all good stories is conflict. So, your protagonist needs an antagonist to bring them all sorts of trouble to stop them from achieving their goal. In a classic comic book story, this will be an obvious “bad guy” — an arch-villain in a superhero comic, a mafia boss in a crime story, a bully, a teacher, or a rival gang in a kids’ adventure comic. But the antagonist can also be a force of nature — a mountain range, a devastating storm, or a wild beast. In the most complex and literary graphic novels, the antagonist may even be an aspect of the protagonist’s own personality. But there has to be one to create conflict and make life hard for your protagonist. If everything comes easy, where’s the story in that?
Outer story arc:
The outer story arc takes you from the opening scene to the ending scene. How do you get there? The outer arc is the series of all the actions your protagonist takes to reach their goal, all the obstacles the antagonist puts in their way, how they respond to those obstacles and the actions they take to overcome them, how they fail and keep trying, and how they eventually beat the antagonist and achieve their goal. In short, it’s the plot!
Inner story arc:
Running along at the same time as the outer story arc is the inner story arc. This is what your protagonist thinks and feels about what’s going on, why they decide to act as they do, and the change in them that gives them the power to overcome the antagonist in the end.
Romantic interest and subplots:
You needn’t always have a romantic interest — a love story — or subplots, which are the stories of the supporting characters like the sidekick, the buddy, a mentor or guide, and so on. But most of the best comic books have at least one subplot, which is usually a romantic one.
Three act structures:
The three acts structure is almost universal as the way of organizing all these elements into a satisfying, balanced story which flows logically from the start, through the middle, to the end. In a comic book, as in a screenplay, you should divide the acts up so that the first act takes about 25% of your story, the second act is about 50%, and the third act is the last 25%. Let’s inspect each of the acts as these are vital to how to plan out a comic book that’s exciting and keeps the reader turning the pages.
- Act One:
This is the setup which introduces the character, their world, their goal, motives, conflict, desires, key relationships and all the rest. It should end with what’s called “the inciting incident” — a key event, usually involving the antagonist, which forces the protagonist out of their everyday life and pushes them into the story with a conflict that they must resolve.
- Act Two:
This is the “meat and bones” of the story. In the second act, each scene shows the protagonist trying to overcome the antagonist and failing because of their flaw. But they keep trying, and the odds against them keep stacking up. The struggle is always harder, until they reach a climax point where all is lost and they will never achieve their goal; that the antagonist has won. But then…
- Act Three:
At the beginning of the third act, the protagonist realizes what they’ve been doing wrong, understands and overcomes their inner flaw, releasing the energy and power to turn the tables in the last minutes, beat the bad guy, and save the day.
You can sum up the three acts like this:
Act One: setup and inciting incident
Act Two: struggle and conflict
Act Three: transformation, final battle, and resolution
Within each act, you’ll have several scenes and in a comic book, each scene will make a series of panels. The basic structure of a scene mirrors the structure of the acts but on a smaller scale. So, in each scene, you need to show your protagonist trying to achieve something, the antagonist or some force linked with the antagonist, making it hard, the action they take to overcome the obstacles, and the outcome of those actions.
So, when you’re working through how to plan out a comic book, you can break up your story into acts, and then each act into scenes. Map it all out from the first scene to the last, writing everything that needs to happen in both the inner arc (the story) and the outer arc (the plot).
Once you’ve got that down, you’re almost — almost but not quite — ready to draw!
3. Reading and analysis (again!)
But before you draw, it’s time to go back to more reading and analysis. You already did some of this in step one. But at that point, you hadn’t learned about structuring a comic book story. Now you’ve done it yourself. So, it’s time to go back to reading your favorite comic books again, but this time, note how they’re laid out. Analyze the stories of three or four of your best-loved comics. Ask yourself:
- Can you work out where the three acts each begin and end?
- How long is the setup phase?
- Does the story start with conflict? Remember that conflict doesn’t need to be physical or even between two people; it could be an internal struggle or against time, a corporation, a force of nature, or even Fate
- How are all the characters and the antagonists introduced?
- How are the protagonist’s goals and motives revealed?
- What is the inciting incident?
- How does the conflict unfold?
- Does it just keep getting harder or are there a few false victories or moments of respite?
- How do the subplots weave together with the dominant story?
- When is the moment of despair when it seems there’s no hope and the antagonist has won?
- What triggers the inner transformation in the protagonist that enables them to find the power to win?
- How does the story resolve?
As you go through your comics analyzing them like this, take special note of the panels. If you took all the text away, even the dialogue, would you still understand what was happening? How do the images guide you through the story? Has the creator chosen a set of panel layouts that they always use for each scene, or do they vary?
All this is vital information that you can use to learn how to plan out a comic book visually. Remember what we said at the beginning? That planning a comic book is more like planning or writing a screenplay for an animated movie than for a novel.
While it’s essential to spend a lot of time at the beginning “in the world of words” as you organize your ideas and develop your characters, plot, and story, a comic book remains, ultimately, a visual medium of storytelling. This is what we come to in the following three steps: visual storytelling.
4. Visualizing your story
Visualizing your story refers to two things at the same time. One is seeing your story in your mind’s eye — characters, places, key scenes, viewpoints, angles, perspectives, distance, and more. You’re not quite at the composition phase just yet, but you’re only one step away. The second meaning is actually making your story visible; meaning storyboarding, rearranging the panels, finding the flow and pace visually, and putting it all together with no words.
At this stage, with your written scene-by-scene story outline based on the three acts, your knowledge of all your characters’ goals, motives, and flaws, and a sense of the outer and inner arc and how they interact, plan out your comic book story in images alone. A good comic book has as few words as possible. And it’s only by making your first attempt to tell the complete story without them you’ll discover where they are essential. Where they are essential are the only places that they should go.
But because you’ll almost certainly change things as you work, we recommend that you storyboard a rough draft using only pencil and without filling in too much detail. Blocking out the spaces and the core dynamics should be enough. And at this stage, you don’t know how many text panels, speech bubbles, and so on you’ll need or where they’ll go. It’s a good idea to use Layout Bond rather than Bristol Paper for storyboarding because you can easily trace over it, extract sections and move them, and so on.
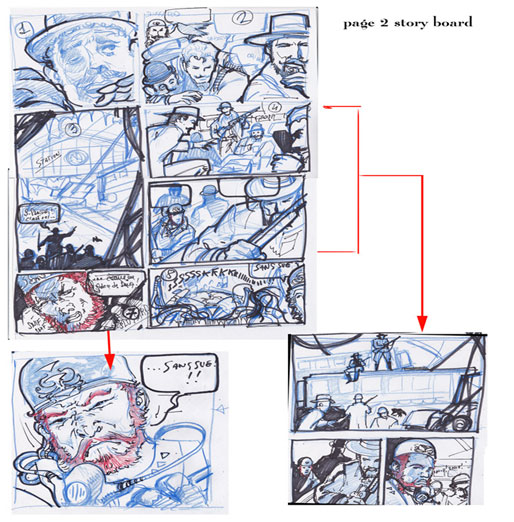
Once you’ve created each scene on the storyboard and you’re satisfied that the story is balanced, flows well, makes sense, and it’s “all there”, you can sketch out where you need descriptive lines of text, scene links and transitions, and, of course, dialogue. You may need to reformat your individual panels and layouts to fit it all in without distracting from the visual impact of the artwork. Once you’re happy with this rough draft, you can go on to the next step.
5. Work out your layout, flow, and panel plan
You’ll have some of this work in place already in the draft. But at this stage, before you complete anything in ink and wash, you have two other factors to prepare which are vital to how to plan out a comic book. These are the flow direction and the layouts.
When you read a novel — depending on where you come from in the world — the text flows in a fixed direction according to established conventions. So, in the USA and most of Europe, we read from the top down, following the text left to right and going back to the left at the beginning of each subsequent line. In other parts of the world, people lay out text differently, to be read starting at the right and moving left, or reading down in columns rather than across in rows, and so on. Any system works so long as both the writer and the reader stick to it.
It’s the same thing with a comic book. Except that there’s no strict convention that applies in all cases anywhere in the world. There’s a general trend to follow a “lightning flash” reading flow, following a zigzag of images down the page from the top left panel to the bottom right. But the layout doesn’t always follow that pattern. You’ll have full page horizontal landscape panels, partially overlapping panels to show rapid series of connected actions, overlays to show events happening at the same time but in different places, larger and smaller panels on the same page, and so on.
So, it’s important to give your layout a lot of thought, decide on a general direction of flow and stick to it unless it’s necessary to deviate for good narrative reasons. Your first page must always establish your chosen convention. You may deviate from it later — as rarely as possible — but establishing it upfront is important for the reader. You don’t want the reader puzzling over which panel comes next; you want them to be immersed in the story so that they even forget that they’re reading a comic book. So, any aspect of the layout that impedes that flow must change.
A good idea is to choose two, three, or maybe four or five layouts, each built on the same flow model, and try to tell your entire story using only those. Giving the reader a sense of logic and familiarity helps them to get beyond the mechanics of the comic book design and get lost in the emotional rollercoaster of the story itself. Limiting your layouts helps.
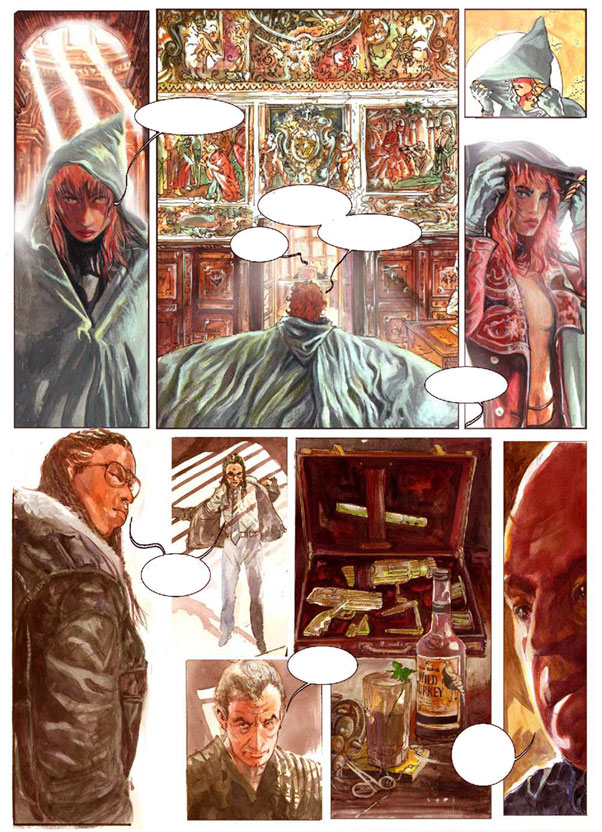
Speech bubbles and captions
Within the context of panel layouts and flow, you’ll also need to decide on the size, style, and location of any speech bubbles and captions. This is down to you as an artistic and design call. However, take care that the positioning doesn’t create confusion and that the bubbles and captions fall naturally under the reader’s eye in the logical order suggested by the flow pattern that you’ve established on a given layout.
Once you’ve got all that worked out, you know what you can do? Yup. You can finally draw the artwork, ink it, color it, do your lettering and produce a final draft of your comic book.
6. Draw your comic book!
As this post is about how to plan a comic book rather than how to create the artwork, we won’t go into too much detail here. But this is where you can have the most fun bringing your characters and story to vivid life on the page. But just a quick word about methods.
If you don’t do your own artwork, you’ll be outsourcing the drawing to a professional artist or your comic book creation buddy. You’ve done your writing work at this stage and you only need to monitor progress. But if you’re doing the artwork yourself, you’ll have a choice of two approaches. You can create the artwork using traditional methods and materials — paper and ink — or you can create all the artwork digitally.
7. Prepare your artwork for printing
If you’re working digitally, you may already have your preferred software, but we recommend either Adobe Illustrator, InDesign, or CorelDraw because you can output vector files in PDF format in the CMYK color space, which is ideal for high-quality offset printing. If you use, say, Photoshop or something similar, you will only be able to export bitmaps. We can still print those, but you’ll need to adjust the resolution up to at least 300 DPI and convert the color space from RGB into CMYK color space. Don’t get too bogged down in all this, though. We’re always happy to help with the technical side and our in-house design experts check every file manually to make sure there are no issues before setting up the press.
If you work with traditional materials, you’ll need to digitize your artwork before we can print it. So, that means scanning it. You can use a commercial scanning service, but it can get quite expensive. If you’ll make several comic books — perhaps because you’re working at a commercial level as a self-publisher or for a small publishing house — it may be worth investing in your own commercial scanner.
But as we said, we can help you with all the technical preparations. Once you work with us, you’ll have a dedicated, named expert to advise and support you through preparing your files to delivery of your final comics. If you have questions at any point, just ask. You can get in touch by telephone, email, Skype, or through the contact form, whichever you prefer.
8. Order a sample print copy of your comic book
Once you’ve been through the process of how to plan out your comic book, created the artwork and text, and prepared all the files for printing, we’ll send you a digital “proof” copy. That’s something we do in every case to make sure that you’re happy with everything before setting the press rolling. But you can also ask us for a printed sample of your finished book. We’ll prepare it for you and send it to you in the mail. Especially if it’s your first time printing a comic book, it’s a great way to make sure you’re completely happy with the result.
9. Print your comic books
Once you’re happy, we’ll print your comic books for you. If you’re wondering how much that might cost, we have a handy at-a-glance printing chart here, or you can use our Online Print Calculator for a more precise quote tailored to your specific project.
Comic book printing costs chart (6.7″ x 10.2″)
| Inner Pages / Quantity | 100pcs | 200pcs | 500pcs | 1000pcs | 2000pcs |
|---|---|---|---|---|---|
| 40pp | $380 | $482 | $575 | $702 | $993 |
| 44pp | $431 | $547 | $650 | $793 | $1107 |
| 48pp | $424 | $540 | $647 | $788 | $1129 |
| 56pp | $480 | $611 | $731 | $910 | $1295 |
| 64pp | $524 | $668 | $802 | $994 | $1429 |
- sewn and perfect bound comic book with 105 gsm / 70 lb art paper for the interior
- A gloss laminated 200 gsm / 80 lb cover.
Once we’ve printed your comic books, we’ll package them with care and ship them to you securely. If you need to ship them to a distributor, that’s no problem. If you want us to store them for you for up to a year, and ship them in smaller quantities as you need them, we can do that, too. Unlike most other offset printing companies that make you print at least 500 or even 1,000 copies — our minimum order quantity (MOQ) is just 100 units. That would fill maybe one standard household bookshelf, so you needn’t have any issues about storage.
10. Distribute and sell your comic
We’ve added this on because it’s worth thinking about who you’ll sell and distribute your product as you work through how to plan your comic book. The length, paper type, size, layout, and so on can all affect the weight and cost of mailing your comics out to buyers or the convenience of taking a box or two to a trade fair, comic convention, or independent comic store for distribution. But you can be sure of one thing, if you print your comic book with us you’ll be in the hands of an expert team with 25+ years of experience in the industry, the latest technology, and a genuine passion for personalized customer care. Not to mention the most competitive offset printing prices on the planet.
Talk to us. We're here to help!
Whether you’re just planning your comic book or you’re preparing your completed files, we’re always happy to hear from you either to chat through how we can help you realize your comic book project or to give you a personalized quote on printing. Get in touch. Just shoot us an email to [email protected] or just call us on +1 951 866 3971 and one of our expert team members will be delighted to help. We can’t wait to be part of your next comic book adventure!


