Custom Card Decks
 Custom Holographic Cards
 Folding Cartons
 Rigid Boxes
 Corrugated Boxes
 Custom Board Game
 Kickstarter Print Solutions
As one of the world's most successful international offset printers specializing in supporting independent publishers, one of the most common errors we see is poor typesetting. Here, we clear up the confusion and explain the basic rules to save you time, trouble, and money when designing your books.
What is typesetting?
The entire purpose of proper typesetting is to make the reading experience as seamless and non-invasive as possible. Even those of us who are unfamiliar with the subject will always notice poor font selection and ill-thought layouts. So, what precisely do we mean by the fundamentals of typesetting, and why is it vital for independent publishers to understand? Typesetting is creating book pages based on particular, long-established criteria in order to generate a professional appearance and provide legible print and layouts of high quality. In short, beautiful pages that are a pleasure to read.
Many self-publishers — especially the least experienced — seem to consider it an insignificant concern to deal with hyphens, widows, orphans, tight and loose lines, and the various other “principles” of typesetting. Most don’t even understand the terms. And that’s fine if you’re outsourcing your book design to a third-party professional. But if you want to handle this aspect of your publishing journey yourself — because of budget constraints or a desire to be in complete creative control of your project — then you need to learn how to do it properly.
Why does typesetting matter?
Every element of the book’s page structure shares a single aim: to decrease the number of pauses or moments of confusion that may disrupt the reading experience. In the early days of self-publishing, readers were more tolerant of poor typesetting as they understood it was all a bit “D.I.Y” and might have even seen it as part of its charm. But times have changed, standards have improved, and in line with reader expectations, the bar has been raised. There is no longer any place for pretense; readers are cognizant of do-it-yourself work, and it’s unfortunate to lose a reader’s attention because of poor formatting, particularly when the content is well worth reading.
So, to help you, we’ve outlined below the major problems we see repeatedly, along with helpful hints and tips to guide you in getting it right. Look out for the points that follow, which are perhaps the most common challenges independent publishers experience when preparing their typesetting and book layouts:
What makes a book look like a book?
The material’s arrangement within a strictly defined zone on the printed page, called the book block, is what makes books appear more like books than pamphlets or brochures, for example. This results from the simple fact that facing pages always end on the same line, giving the book block its characteristic appearance. The sole exception may be the chapter’s concluding page.
Margins and binding
Because of the large margins of white space surrounding the book block, the reader’s eye may move easily from one line to the other while reading. When binding a book’s pages, the process squeezes them together slightly, removing some of the margin space. If you don’t account for this compression, the margin on the binding’s inner side may appear to be smaller than the margin on the outside.
Alignment
The text ought to be aligned across the entire page. Consider a traditionally produced book: if you lay a ruler below a line on the left-hand page, it will correspond with the same line on the page opposite it. Misaligned pages are a common error that we often see in files submitted to us for printing from inexperienced designers. If it’s the first time you’ve designed a book interior, you’ll need to spend plenty of time changing the spacing between lines to make sure this alignment is precise, especially if you add subheadings, lists, and images.
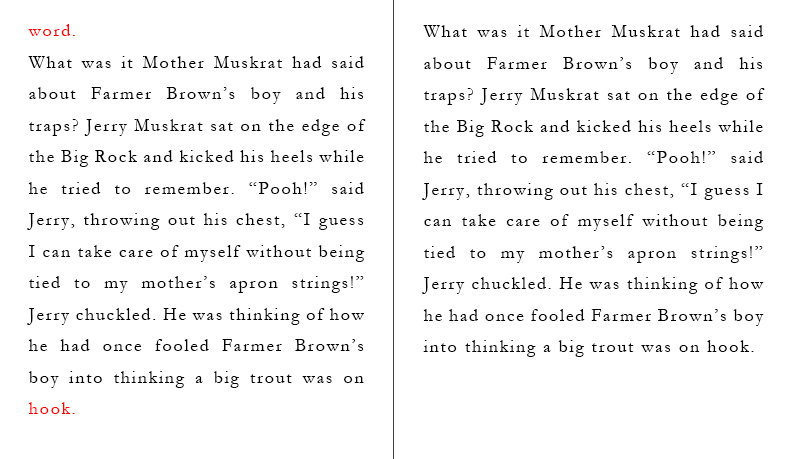
Widows and orphans
In typography, a “widow” is a solitary line of text at the end of a paragraph that ends up at the top of the next column, and an “orphan” is a single word occupying the last line on a page. To avoid widows and orphans, you need to make sure that the first line of a paragraph does not overlap with the last line of a page, and that the final line of a paragraph does not extend to the top of the page that comes after it. When lines are widowed or orphaned, they force the reader to pause, impeding their ability to absorb the text. To remove these, a professional book designer will go forward and backward several times, adjusting pages as needed. If you’re going to do it yourself, you’ll need to do that, too. When a subhead appears at the bottom of the page, it ought to be followed by at least two lines of text while maintaining the book block. Leaving orphaned headings looks ugly and may be confusing for the reader.
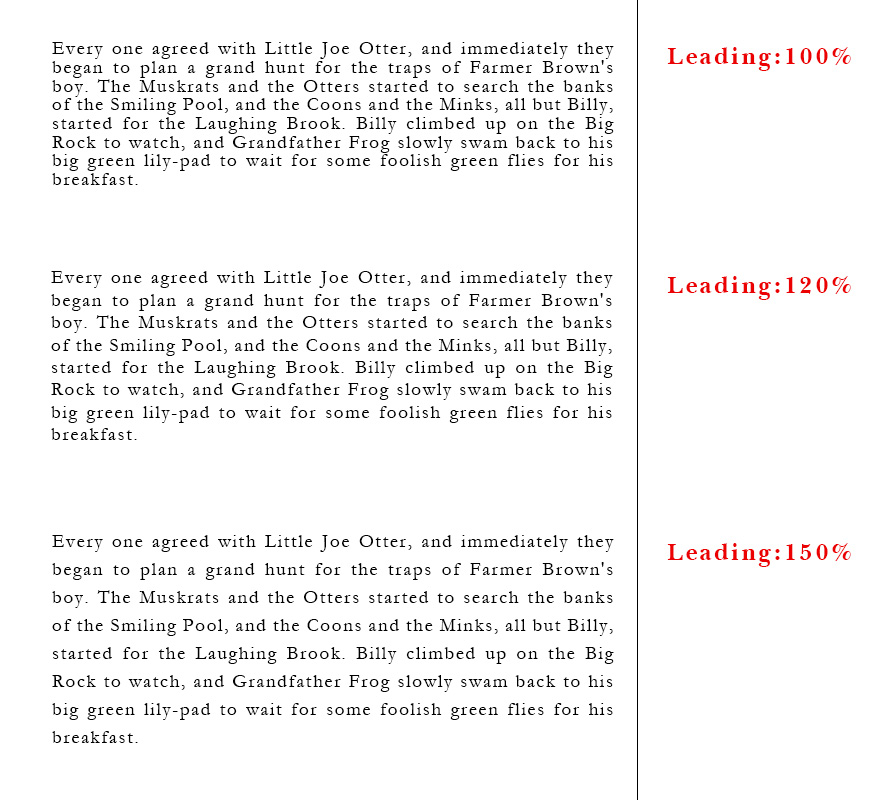
Line spacing / Leading
It’s challenging for readers to follow lines of text that are too close together or overly far apart in terms of line spacing. Some independent authors with whom we’ve worked have tried to increase or decrease the total number of pages of a book by adjusting the line spacing. This action typically aims to reduce the costs connected with printing the book. Take this advice to heart, however: while there’s a certain amount of “wriggle room” in line spacing, do not overcompensate for your page count by adding or removing so much line spacing that it looks silly. The small saving you might make in production costs will not be worth the loss of sales you experience because you’ve printed an unreadable book!
Most times, there ought to be no line space separating paragraphs. Known as paragraph spacing, leaving these gaps is great when you’re publishing online — say a blog or web page — but looks odd and distracting on the printed page. The only exception is a scene transition or the start of a new section, which you can show by inserting a line space before a paragraph if you think it’s really necessary. If there is an empty line before the paragraph concerned, eliminate the first-line indentation.
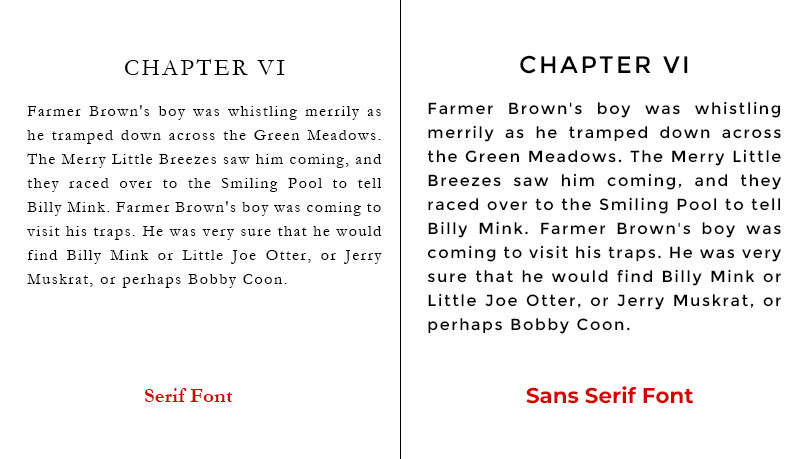
The matter of fonts
Serif fonts are preferable for longer stretches of writing. Our minds learn to identify word shapes rather than reading every single letter individually. Serifs, which are the ornamental flourishes that complete the ends of a letter, form a link between the letters, which produces a shape that is more recognizable and easy on the reader’s eye compared to a sans serif font. We strongly advise using typefaces without serifs only for headlines and other small-scale purposes. To improve readability, choose a type size with a maximum of 70 characters per line.
Dashes
Each style of font has three different dashes. They are:
- Hyphens
- Em dashes
- En dashes
The purpose of hyphens is to link separate words that grammar dictates must be connected, and phone digits. For example, “My mother-in-law is coming for tea.” “My phone number is 1-227-8874650.”
In a sentence, we use em dashes to balance clauses or in place of commas, colons, and parentheses. For example, “By the time I’d completed the formatting — which seemed to take forever — I was ready for some downtime.”
We typically use en dashes, which are equal to half of an em dash, to show duration. For example, “I worked in the publishing house for ten years, 1990–2000.”
Avoid word stacking
Remember the fact that you ought not to start or end three successive lines with the same word. This phenomenon — called “word stacking” — just looks ugly on the page and is both boring and confusing for the reader. You can get rid of word stacking by overriding your software’s settings and manually adjusting word spacing or tracking, as well as rewriting the content.
Kerning and tracking
Kerning and tracking are two similar but distinct techniques for making sure that everything fits nicely in the book block and that the letter and word spacing is comfortable on the eye. Kerning refers to adjusting the spacing between individual letters and tracking is about spacing between words. It’s detailed work, and most times you may not need to get into it, but it’s worth knowing about.
Quotation marks
Always double-check that you correctly position your quotation marks at the opening and closing of the quotation. use double quotation marks for dialogue and single quotation marks for anything quoted within the main quotation. As a general rule, all punctuation should go within the quotation marks, including the period. The only common exception is when a question mark or an exclamation mark are not part of the quotation and the quotation is part of the question or exclamation.
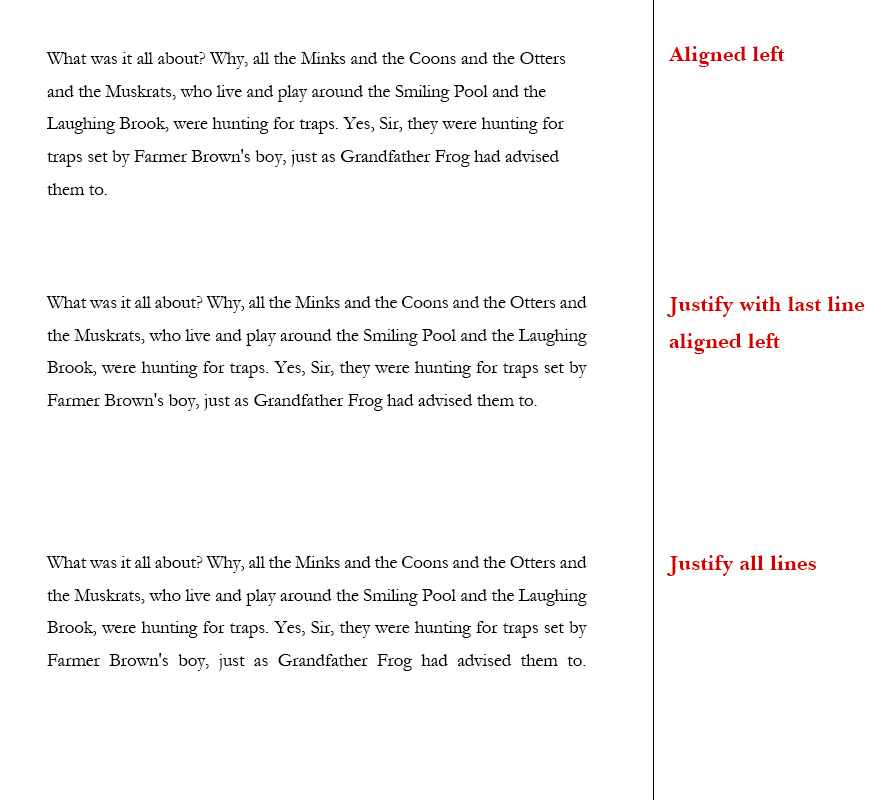
Justification
Justification is when both the left and right edges of the text are flush with the outer limit. All text on the page should be justified for print. There are no exceptions.
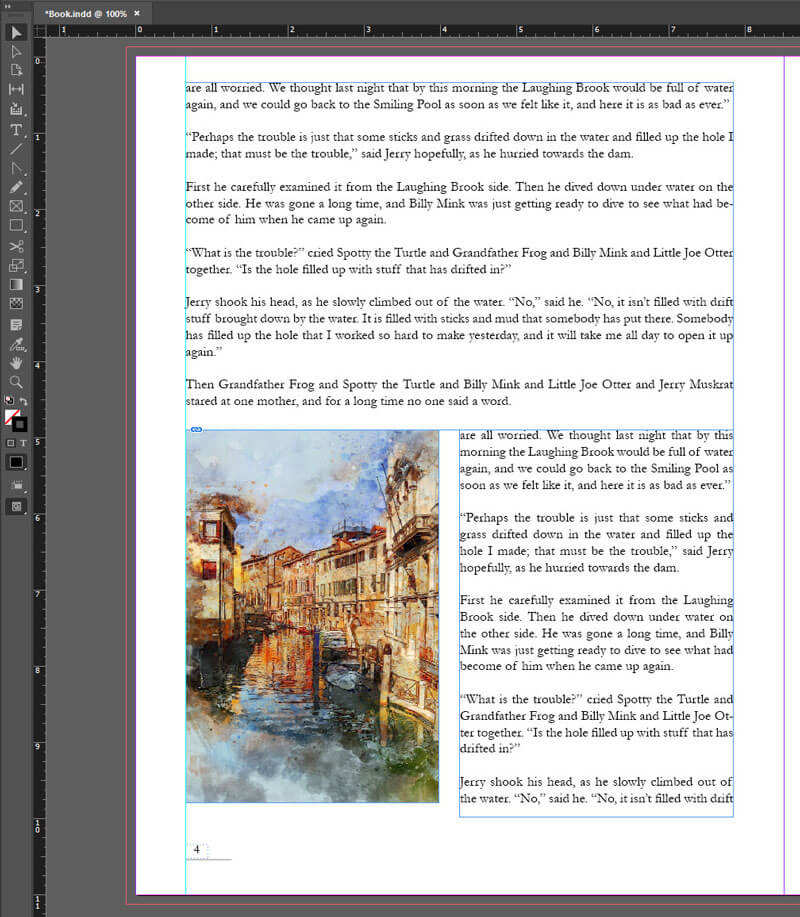
Typesetting with Adobe InDesign
There are several settings in Adobe InDesign, a professional design software which we recommend for preparing your book files for printing, that allow designers to comply with the rules. This is only possible if the designer knows which settings to change. Only in extreme cases would skilled typesetters use this software in its default configuration. They frequently change the parameters for the optimum results, typically paragraph by paragraph, line by line, and sometimes word by word. This is a difficult but rewarding job that dates back to the time when conventional typesetters were in demand and literally cut and pasted printed text or laid out letter blocks on the press.
If you want to handle a book layout and typesetting yourself, you can get professional design software like InDesign and learn how to make the best use of it. However, you ought to be mindful that there is a substantial learning curve that comes with this process. In order to achieve the intended professional result, such software necessitates an investment, not just regarding purchase price, but also regarding time spent learning how to use it.
There will always be the option of hiring a qualified designer. If you can budget for it, that’s what we recommend. If not, we hope this post is useful to you and that you will continue to bear the design recommendations presented here in mind. Of course, if you choose to print your books with us, our expert design team will always be on hand to answer your questions and give you precise and helpful advice every step of the way to make sure your book comes out 100% perfect in print.
Talk to us today
At QinPrinting, we enjoy considerable success in the offset printing industry and have helped thousands of independent publishers just like you to beautiful world-class editions of their books. Our expert design and printing team, coupled with state-of-the-art offset printing technology, and a real commitment to personalized customer care sustains our worldwide reputation for combining the speed, efficiency, and value for money you expect from a major international printer with the personal attention you’d want in your local print shop. Get in touch today to discuss your needs or ask us for a no-obligation quote. We’re here and happy to help.