Our detailed step-by-step instructional guide with video, text, and screenshots, explaining exactly how to design, prepare, and export a print-ready PDF using Adobe Illustrator
In this post, we present an easy-to-follow guide on preparing PDF print files in Adobe Illustrator. Whether you’re a freelance designer, a marketing professional, a small business owner, or a self-publisher, mastering the art of print design is essential for bringing your creative work to life on the printed page. In this detailed tutorial, we’ll not only walk you through the practical steps of setting up, designing, and exporting print-ready PDF files but also provide valuable insights, troubleshooting tips, and answers to frequently asked questions to make sure your designs are perfectly formatted and ready for print.
Setting up your document
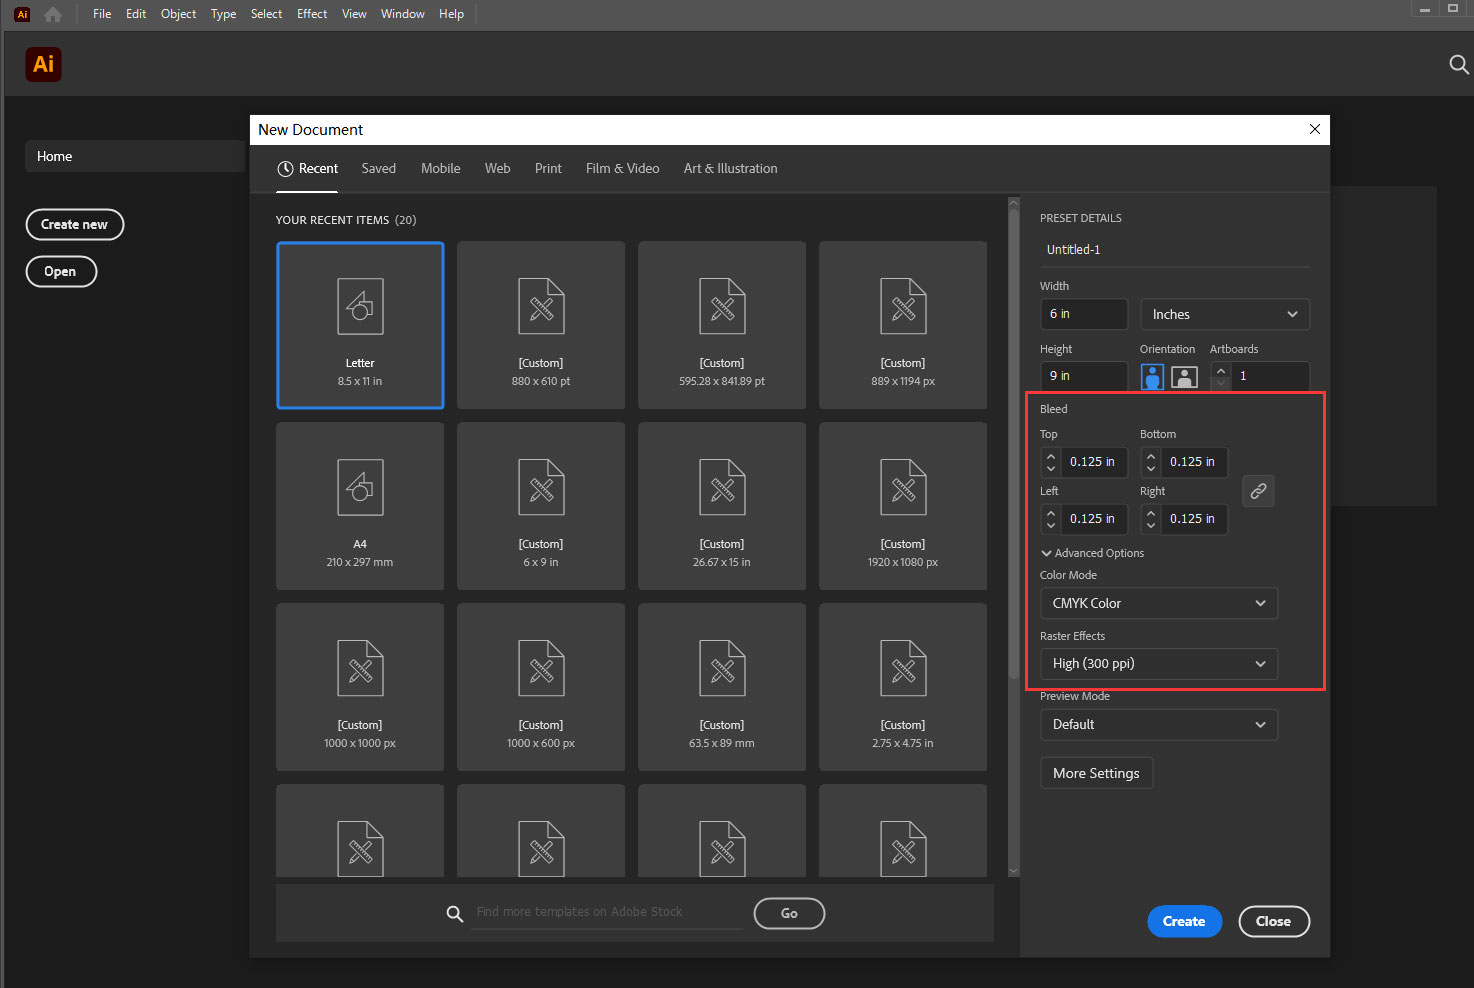
To begin, launch Adobe Illustrator and create a new document by clicking on “Create.” Input your desired finish size and select the correct units to guarantee accuracy from the start. Remember, the choice of units (inches, millimeters, etc.) can significantly impact the final dimensions of your printed piece.
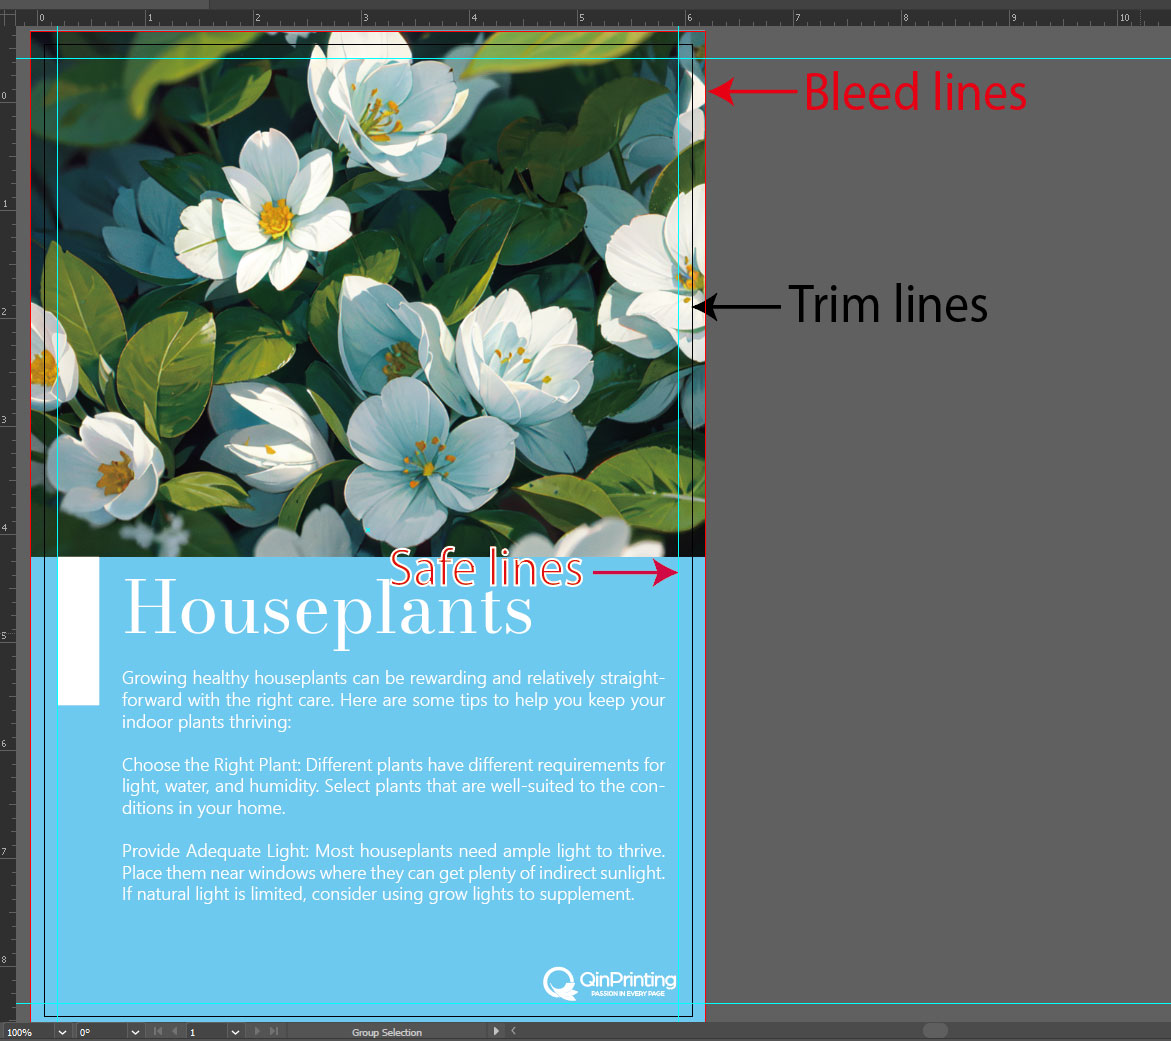
Next, set the bleed to 0.125 inches or 3 mm to accommodate any trimming variations during the printing process. This ensures that your design extends beyond the trim edge, preventing unwanted white edges.
Understanding document layout
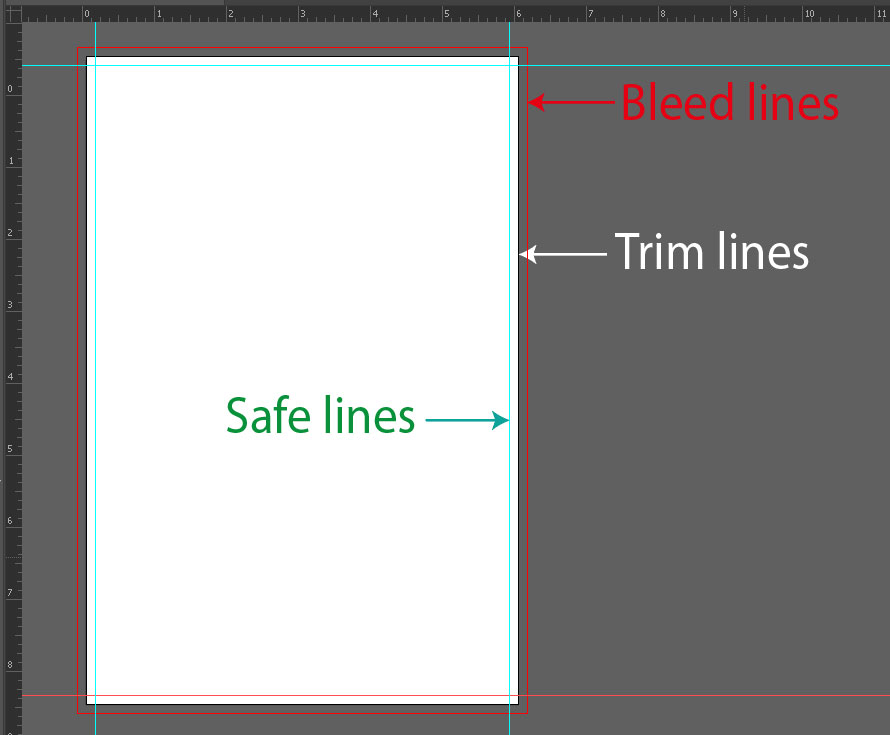
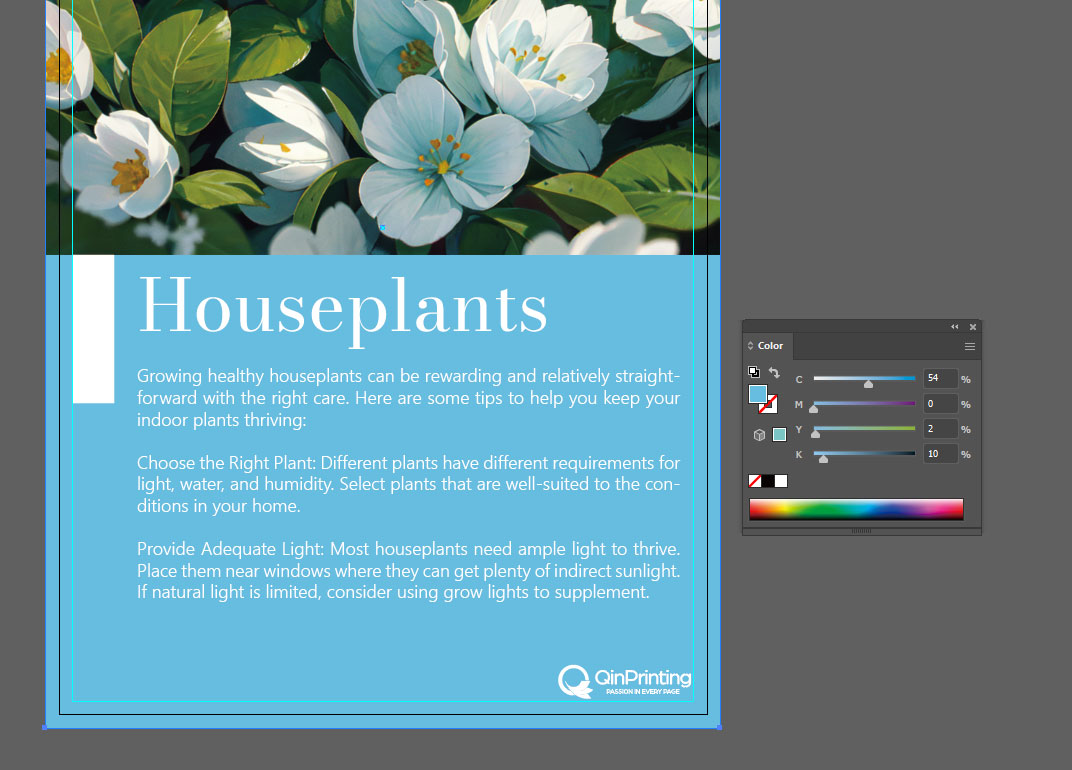
With your document set up, it’s important to understand the layout elements that will influence the final printed result. The white area represents the finished size of your piece, while the red lines indicate the bleed area.
Guidelines play a vital role in maintaining consistency and alignment across your design. Use them to delineate margins, columns, or other structural elements, keeping your layout organized and visually appealing.
Color space and image file resolution
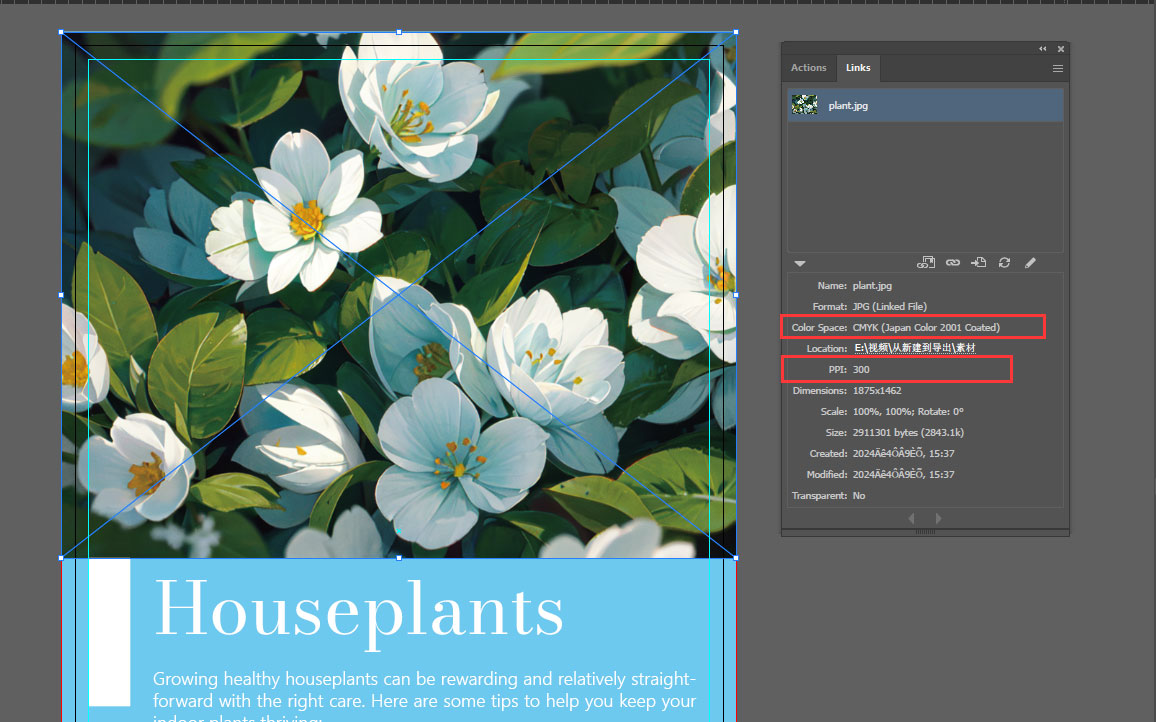
As you work through the design process, keep print considerations at the forefront of your mind. Start by selecting the appropriate color mode for accurate color reproduction in print. Make sure that all images are in CMYK mode to maintain clarity and vibrancy in print. Remember, the quality of your images directly impacts the final output.
When selecting the “Raster Effects” setting, opt for “High (300 dpi)” to guarantee that your graphics and effects maintain crispness and clarity in print.
Export your PDF
Once your design is complete, you can move on to export your PDF print file. Click on “Save” and choose the file type as “Adobe PDF” to initiate the export process. In the pop-up window, check the option “Use Document Bleed Settings” under marks and bleeds to preserve your bleed settings during export. This makes sure that your design extends to the edge of the printed page, maintaining a professional appearance.
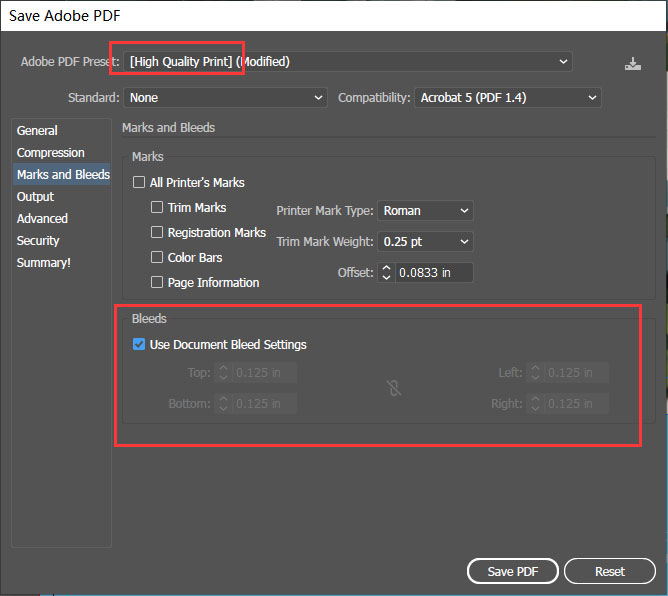
With your PDF export settings configured, click “Save” to generate your print-ready file. Congratulations! Your project is now poised for production, ready to be printed.
Troubleshooting
Even with careful preparation, you may find for one reason or another that certain issues arise during the PDF print file preparation and export process. Here are some common problems and challenges we’ve seen — complete with our solutions:
Font embedding errors
Problem: Some fonts may not embed properly in the PDF file, leading to font substitution or missing text.
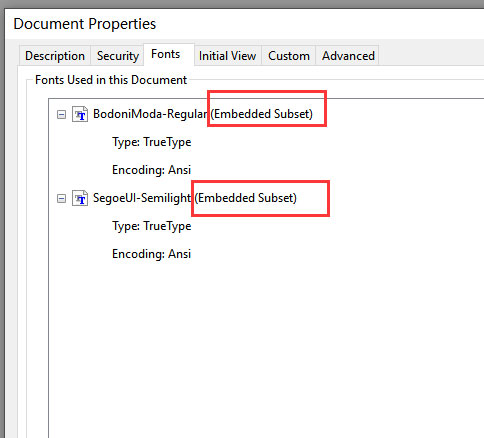
Solution: Check the font embedding settings in Adobe PDF. Make sure that all fonts used in the document are either embedded or outlined to avoid potential issues with font compatibility.
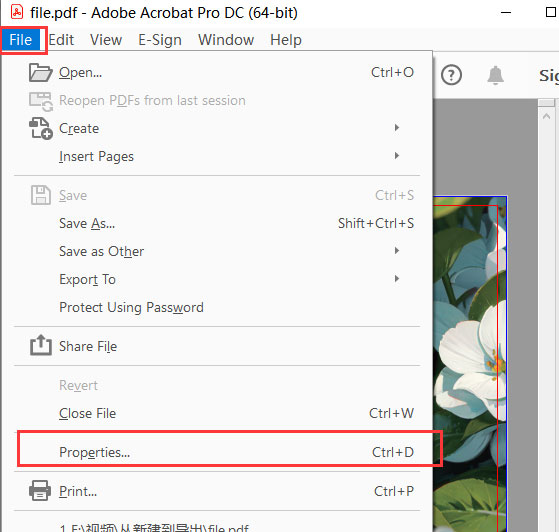
You can check whether the font is embedded in Adobe Acrobat: choose “File” -> “Properties” ->”Fonts”
Color profile mismatches
Problem: Colors may appear differently in the final printed output due to color profile mismatches between the document and the printer.
Solution: Use the appropriate color profile for your print project and check that all images and graphics are converted to the correct color space (CMYK) before exporting the PDF. We recommend using Japan Color 2001 Coated for design. But when exporting files, please select “Don’t include profile”. If in doubt, or if you’ve chosen Spot colors or Pantone, get in touch with us to confirm your preferred color profile for printing.
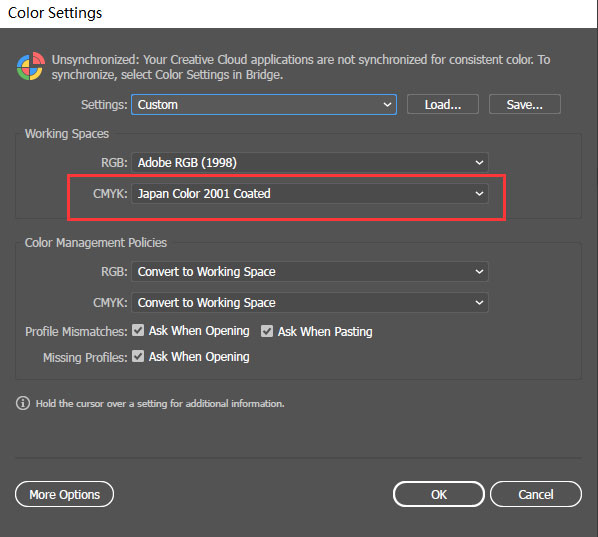
Image resolution issues
Problem: Low-resolution images may appear pixelated or blurry in the final printed output.
Solution: Remember to use high-resolution images (300 dpi or higher) in your Adobe Illustrator document to maintain image quality in print. You should also double-check the resolution of all images before exporting the PDF and replace any low-resolution images with higher-quality versions if necessary.
Trimming errors
Problem: The final printed piece may have uneven or inaccurate trimming, resulting in a misaligned design.
Solution: Double check that you’ve set up your bleed and trim marks correctly in the Adobe Illustrator document to guarantee that there is enough bleed area to accommodate trimming variations.
FAQs
Here are answers to some frequently asked questions about preparing and exporting print-ready PDF design files in Adobe Illustrator:
What is Adobe Illustrator, and why is it commonly used for print design?
Adobe Illustrator is a vector graphics editor used by designers to create and edit vector-based artwork. It’s preferred for print design due to its ability to create high-resolution, scalable graphics suitable for various print media, including books, cards, board games, brochures, business cards, posters, and more.
Why is it important to set up bleed in my Adobe Illustrator document for print projects?
Bleed ensures that your design extends beyond the trim edge, allowing for any trimming variations during the printing process. This prevents unwanted white edges and guarantees that your design appears seamless and professional when trimmed.
How do I know if my images are suitable for print in Adobe Illustrator?
Check the resolution of your images to make sure they have a minimum resolution of 300 dpi (dots per inch) for optimal print quality. Low-resolution images may appear pixelated or blurry when printed, so it’s essential to use high-resolution images for crisp, clear results.
What color mode should I use for print projects in Adobe Illustrator?
We recommend you use the CMYK color mode for print projects in Adobe Illustrator. CMYK (Cyan, Magenta, Yellow, Black) is the standard color model used in printing, furnishing accurate color reproduction in print. Other options include spot colors and the Pantone system, but talk to us first if that’s what you want to use.
What should I do if my exported PDF file is too large to upload or send by email?
If your exported PDF file is too large, consider using online compression tools or third-party software to reduce the file size without compromising print quality. Remember, you can also send us files via file-sharing platforms such as WeTransfer and DropBox.
How do I ensure that my PDF file includes the bleed area when exported from Adobe Illustrator?
When exporting your PDF from Adobe Illustrator, make sure that the “Use Document Bleed Settings” option is checked under marks and bleeds in the export settings. This guarantees that the bleed area is included in the exported PDF, allowing for proper trimming during printing.
What should I do if my colors appear differently in the sample or prototype?
If colors appear differently in the sample or prototype, verify that your Adobe Illustrator document is using the correct color profile for printing (CMYK). If problems persist, talk to us and we’ll check your color profile and adjust any specific color calibration requirements.
What steps can I take to prevent trimming errors in my printed piece?
To prevent trimming errors, ensure that your Adobe Illustrator document is set up with proper bleed and trim marks and that all your essential content is safely within the block. Verify that your design extends to the bleed area and that essential content remains within the safe area to avoid any misalignment or cropping during trimming.
Talk to us! We're here to help
By following the steps outlined in this tutorial, along with the troubleshooting tips and answers to frequently asked questions, you’re well-equipped to tackle any print design project with confidence and finesse. Remember, print design is both an art and a science, requiring attention to detail, creativity, and technical precision. Armed with the knowledge and techniques shared here, you’re ready to create stunning print materials that are ready to print. Still need more help? No problem! Just get in touch.